1. Preliminaries
Sections of the tutorial will continuously be published at this web page.
1.1. Getting Started
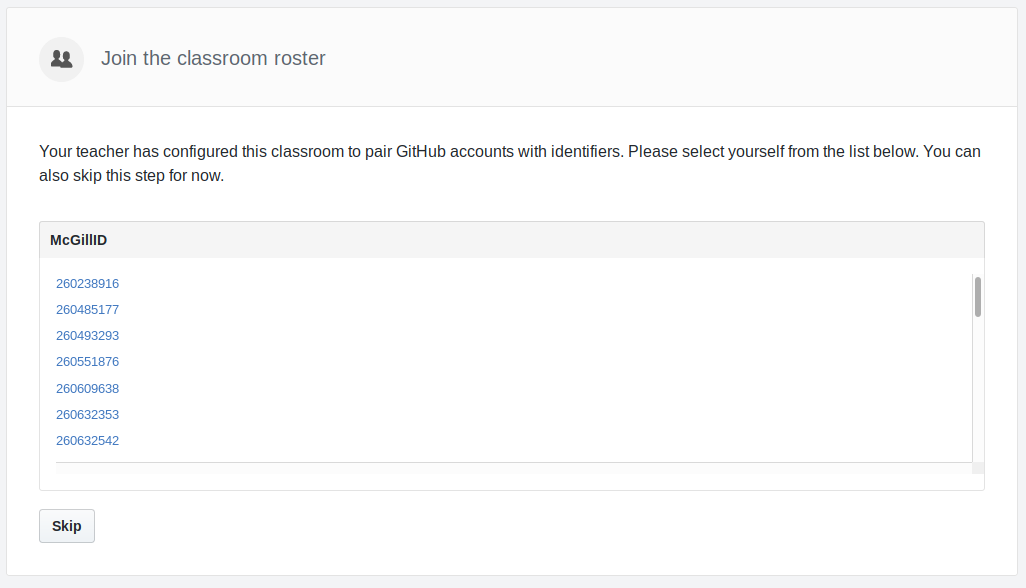
Steps for signing up for GitHub classroom:
-
Log in/Register on GitHub.
-
Open link https://classroom.github.com/g/HbhgnXXn
-
Select your McGill ID from the list
-
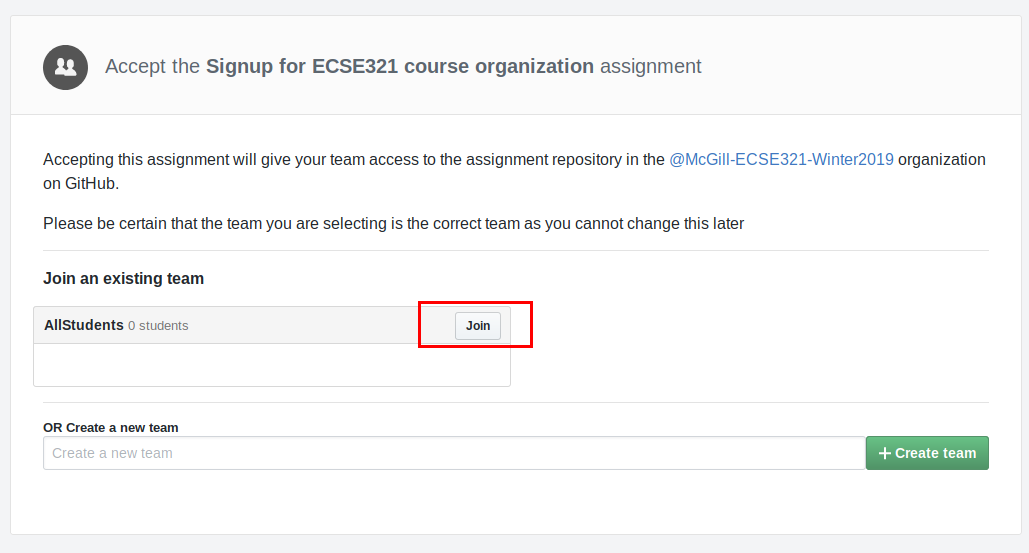
Join team AllStudents
1.2. Project Management Tools for Agile Development
1.2.1. GitHub Projects
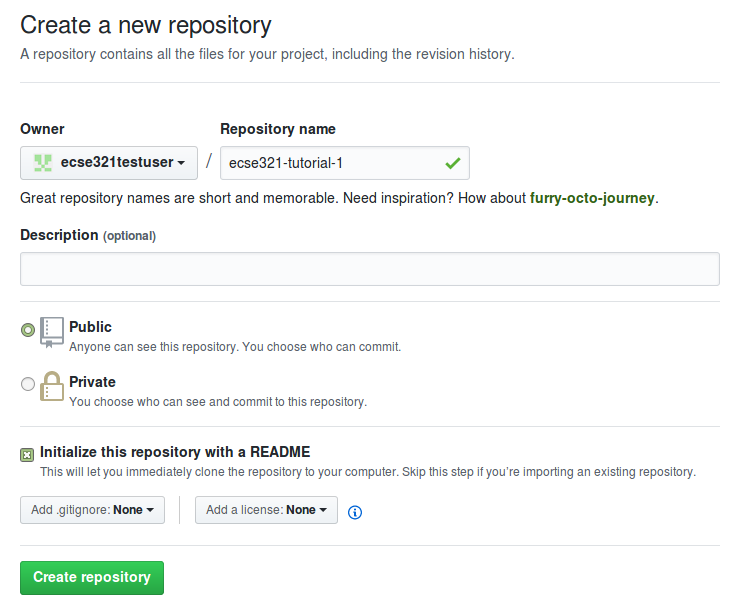
First, we create a new repository under everyone’s own account to demonstrate the basic features of "GitHub Projects".
-
Visit https://github.com/ then click on New repository (green buttom on the right).
-
Set your user as the owner of the repository.
-
Give a name for the repository (e.g., ecse321-tutorial-1), leave it public, then check Initialize this repository with a README. Click on Create repository afterwards. At this point the remote repository is ready to use.
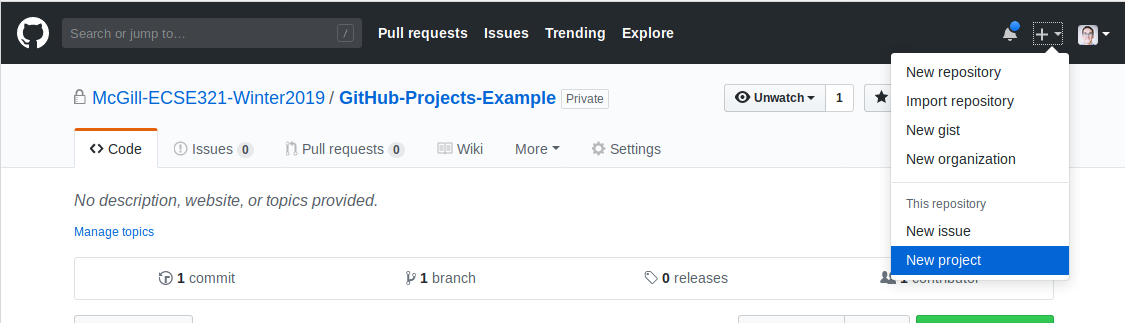
Once the repository is ready, associate a new GitHub Project and see how their features work. Create a project:
Select Basic Kanban project style:
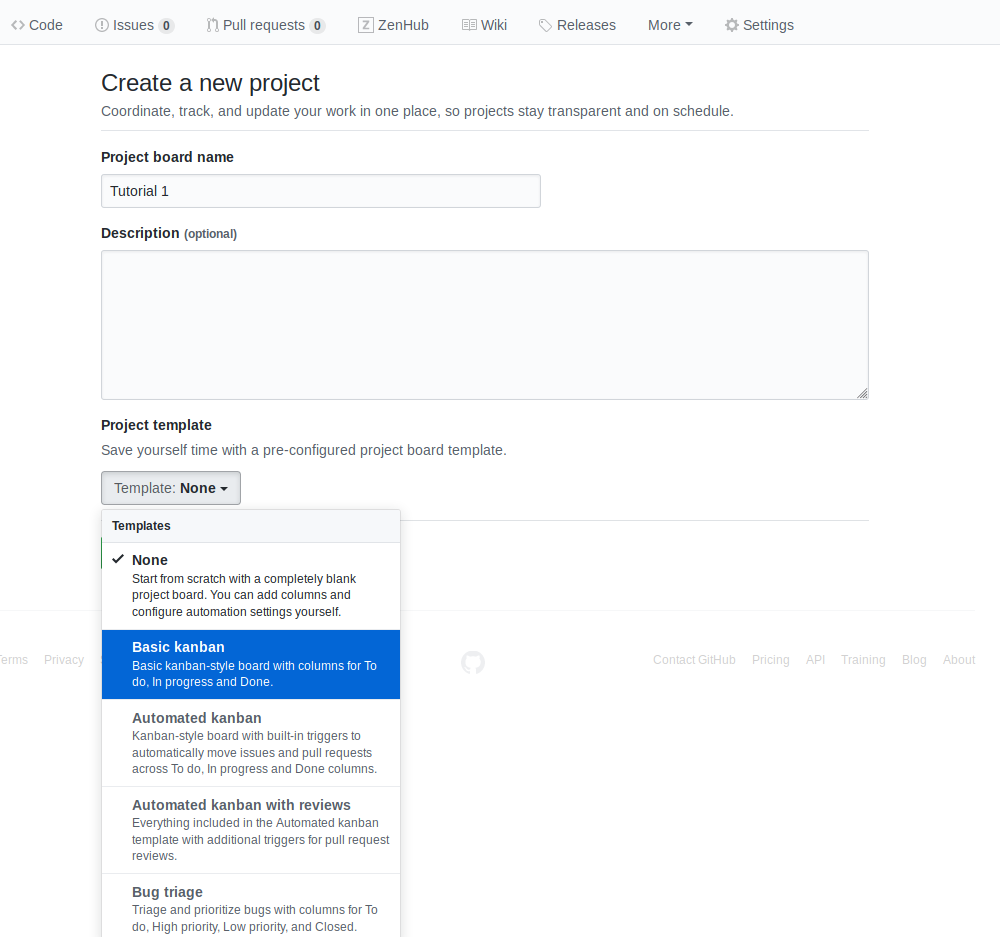
Tasks to complete:
-
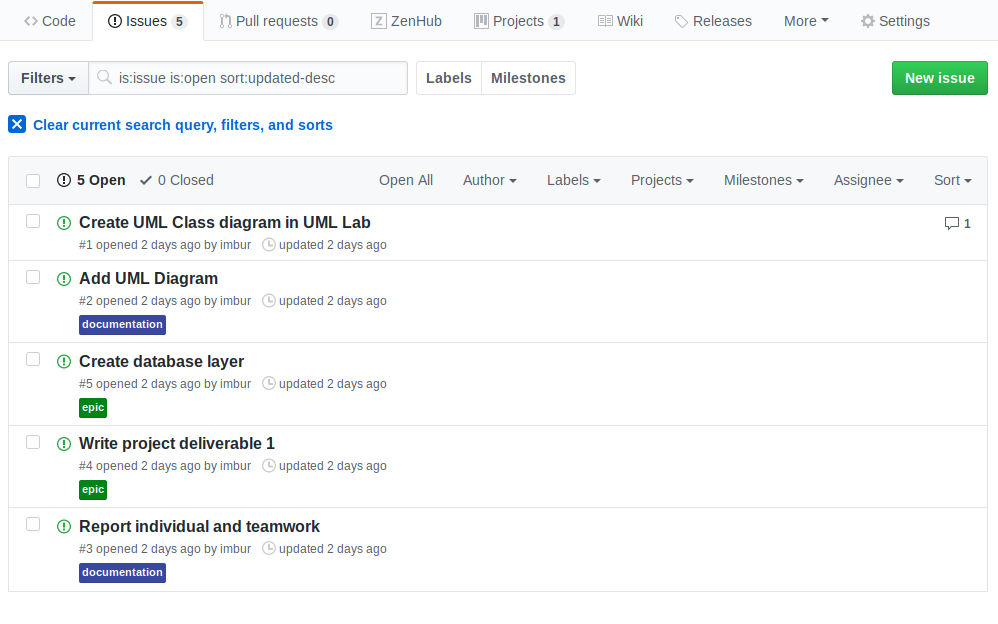
Create a few issues to outline the tasks for the first deliverable. Assign them appropriate labels and add yourself as the assignee!
-
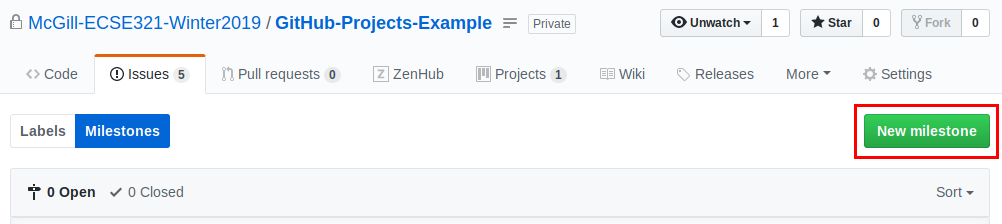
Create a milestone for the issues.
-
Create cards from the issues on the project board.
-
See how GitHub track the project progress as you move the cards from the different columns.
1.2.2. ZenHub
ZenHub is an addition to GitHub that is designed to provide features helpful for agile development processes. It basically extends and replaces classic GitHub Projects.
-
Log in with your GitHub account on https://www.zenhub.com/
-
Open the repository at https://github.com/McGill-ECSE321-Winter2019/ZenHub-Example
-
Create a new epic about "Desinging REST API for backend <McGill ID>" and add your McGill ID to make the epic’s name unique
-
See how your epic is automatically created as an issue and added to the GitHub issue tracker! What else does ZenHub take care of?
-
Optional: add the Firefox/Chrome ZenHub extension to your browser to allow full integration of ZenHub to the GitHub web UI
Other resources for ZenHub:
-
Getting started: https://www.zenhub.com/blog/getting-started-with-zenhub/
-
Video tutorial: https://www.youtube.com/watch?v=TRu7vKCg920
1.3. Git and GitHub
1.3.1. Installing Git
Install the Git version control system (VCS) from https://git-scm.com/downloads.
1.3.2. Cloning to a local repository
-
Open up a terminal (Git bash on Windows).
-
Navigate to the designated target directory (it is typical to use the
gitfolder within the home directory for storing Git repositories, e.g.,cd /home/username/git). -
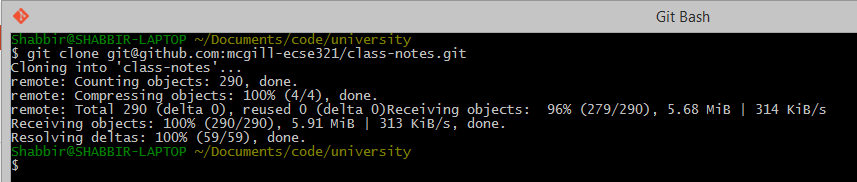
Using a Git client, clone this repository to your local Git repository. First, get the repository URL (use HTTPS for now).
Then, issuegit clone https://url/of/the/repository.git
You should get an output similar to this:
-
Verify the contents of the working copy of the repository by
ls -la ./repo-name. The .git folder holds version information and history for the repository.
1.3.3. Git basics
-
Open up a terminal and configure username and email address. These are needed to identify the author of the different changes.


Glossary — Part 1:-
Git is your version control software
-
GitHub hosts your repositories
-
A repository is a collection of files and their history
-
A commit is a saved state of the repository
-
-
Enter the working directory, then check the history by issuing
git log. Example output:
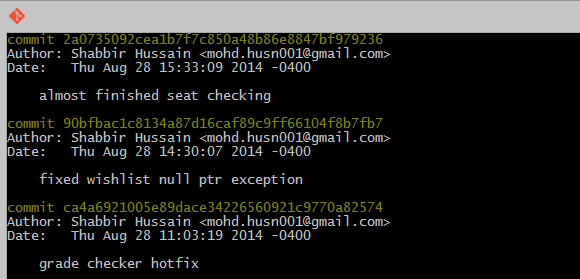
-
Adding and commiting a file: use the
git addandgit commitcommands.


The effect of these commands are explained on the figure below:
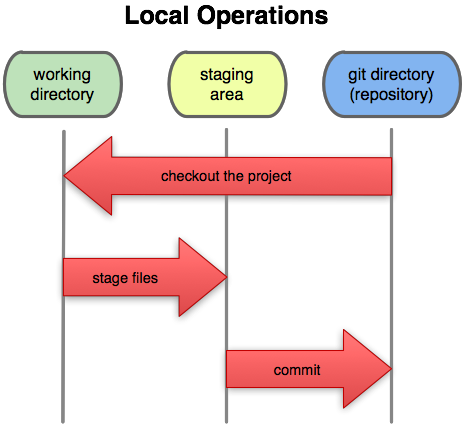
Glossary — Part 2:-
Working Directory: files being worked on right now
-
Staging area: files ready to be committed
-
Repository: A collection of commits
-
-
Checking current status is done with
git status.

-
Staging and unstaging files: use
git resetto remove files from the staging area.

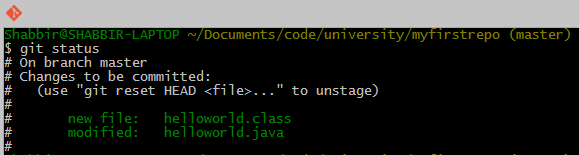
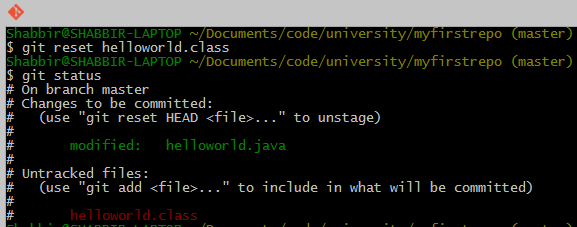
Important: only staged files will be commited.

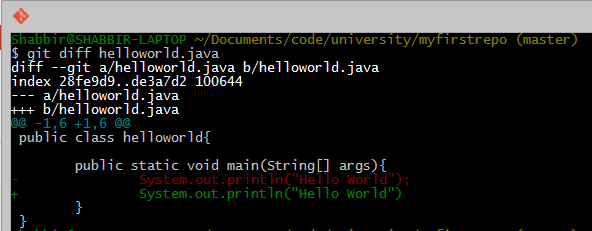
-
To display detailed changes in unstaged files use
git diff, while usegit diff --stagedto show changes within files staged for commit.
-
Reverting to a previous version is done using
git checkout.

-
The commands
git pull(or thegit fetch+git rebasecombination) andgit pushare used to synchronize local and remote repositories.

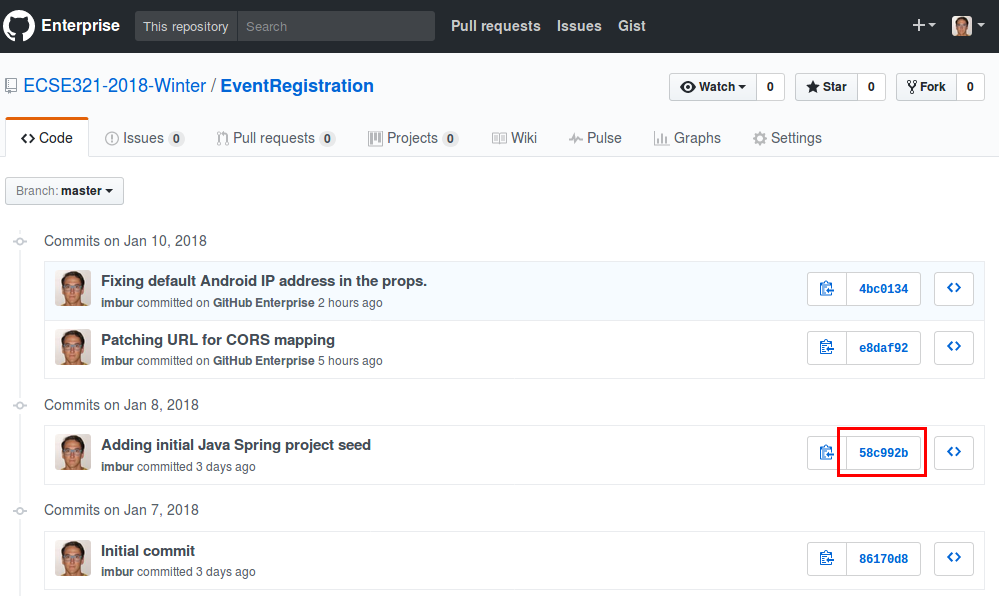
1.3.4. Browsing commit history on GitHub
-
You can browse pushed commits in the remote repository online using GitHub. You can select the commits menu for a repository.
To get a link for a specific commit, click on the button with the first few characters of the hash of the commit.
1.3.5. Linux commands cheat sheet:
-
cd: change/navigate directory -
ls: list contents of a directory -
ls -la: list all contents of a directory in long listing format -
touch: create a file -
cp: copy a file -
mv: move a file -
rm: remove a file -
mkdir: create a directory -
cp -r: copy a directory recursively with its contents -
rmdir: remove a directory -
rm -rf: force to recursively delete a directory (or file) and all its contents -
cat: concatenate and print contents of files -
nano: an easy-to-use text editor
The source for most of the images in the Git documentation: https://github.com/shabbir-hussain/ecse321tutorials/blob/master/01-githubTutorial1.pptx
1.4. Travis CI
-
Go to https://travis-ci.com/, click on Sign up with GitHub.
-
Click on the green authorize button at the bottom of the page.
-
Activate Travis-CI on your GitHub account
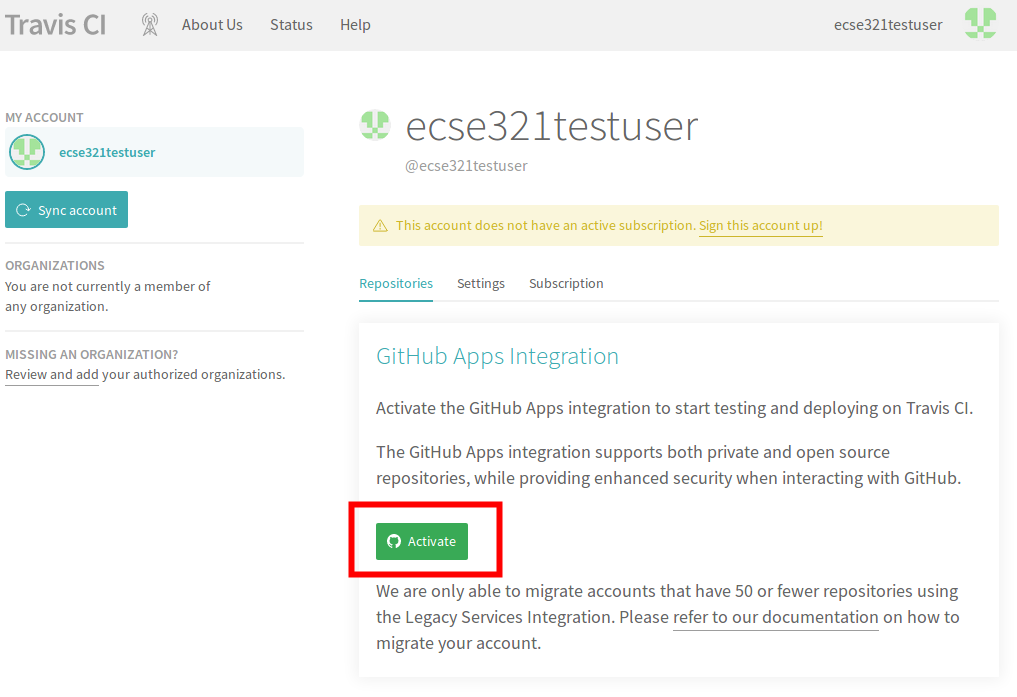
-
Select the repositories you want to build with Travis (make sure to include your repository that you created for this tutorial). You can modify this setting anytime later as well.
-
In your working copy of your repository, create a default Gradle java project.
-
Make sure you have Gradle installed (
gradle --version). -
Issue
gradle init --type java-library -
Add a
.gitignoreto ignore generated resources by Git:.gradle/ build/ -
Make sure your application is compiling by running
gradle build
-
-
Create a file called
.travis.yml:language: java script: - gradle build -
Commit and push your work. If everything is set up correctly, the build should trigger and Travis should run your build using Gradle.
2. Build and Deployment
2.1. Gradle: A Build Framework
2.1.1. Example Gradle application
This section focuses on writing a Gradle (https://gradle.org/) build script that builds a single Gradle project referred to as Computation. The source code and tests for a Java application is available here: Computation.zip (src and tst folders). It is your job to create a folder called Computation, move sources and tests into that folder, and produce the Gradle build script build.gradle within this folder to automate the software build process for this project.
First, open a terminal, and ensure you have the newes version of Gradle (ver. 5.0+) installed with gradle --version.
Follow the steps below and add the snippets listed here to build.gradle, one after the other:
-
Create the following folder structure and a new build.gradle (empty) file within the Computation folder:
Computation
├── build.gradle
└── src
    ├── main
    │   └── java
    │       ├── application
    │       │   └── CompApp.java
    │       ├── computation
    │       │   └── Computation.java
    │       └── view
    │           └── ComputationPage.java
    └── test
        └── java
            └── computation
                ├── AllTests.java
                ├── ComputationTestAddSubstract.java
                └── ComputationTestDivideMultiply.java
-
Add the
javaand theapplicationplugins to the build configuration script build.gradle.apply plugin: 'java' // This plugin has a predefined 'run' task that we can reuse to use Gradle to execute our application apply plugin: 'application' -
Add JUnit libraries to the
dependenciessection.repositories { mavenCentral() } dependencies { testImplementation "junit:junit:4.12" } -
Add and describe a new task
compile(type: JavaCompile)to specify all source files (both application and test) and set the build/bin as destination dir to put all compiled class files in.task compile(type: JavaCompile) { classpath = sourceSets.main.compileClasspath classpath += sourceSets.test.runtimeClasspath sourceSets.test.java.outputDir = file('build/bin') sourceSets.main.java.outputDir = file('build/bin') }NoteOne can specify source sets and their variables the following way: /* * specifying sourceSets is not necessary in this case, since * we are applying the default folder structure assumed by Gradle */ sourceSets { main { java { srcDir 'src/main/java' } } test { java { srcDir 'src/test/java'} } } -
Specify the main class and run the application.
mainClassName='application.CompApp'In the command line issue
gradle run -
Describe the
jarGradle task (defined by thejavaplugin) to produce an executable jar file intodistributable/.jar { destinationDir=file('distributable') manifest { // It is smart to reuse the name of the main class variable instead of hardcoding it attributes "Main-Class": "$mainClassName" } }
|
Note
|
The settings.gradle and its usage is to be shown later.
|
2.1.2. Setting up a Spring/Spring Boot backend app with Gradle
-
Install the Spring Boot CLI
-
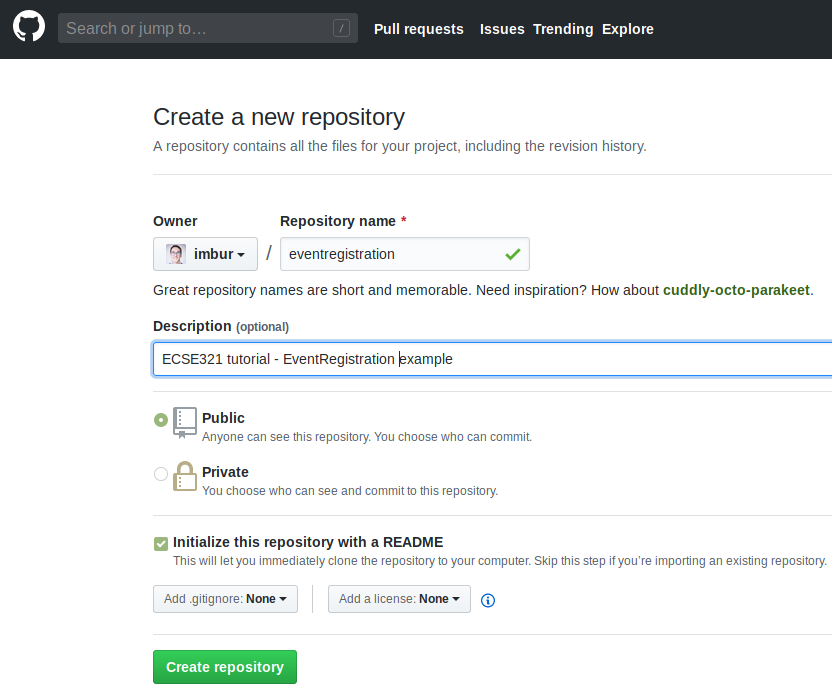
Create a new repository under your account on GitHub for an example application that we are going to develop throughout the semester. Name the repository eventregistration. See more on the specification of the application functionality later.
-
Clone it somewhere on your disk. We assume you cloned it to ~/git/eventregistration.
-
Navigate to that folder in the terminal:
cd ~/git/eventregistration_. -
Create a project for the backend application using Spring Boot CLI in this repository.
spring init \ --build=gradle \ --java-version=1.8 \ --package=ca.mcgill.ecse321.eventregistration \ --name=EventRegistration \ --dependencies=web,data-jpa,postgresql \ EventRegistration-BackendNoteBackslashes in this snippet indicate linebreaks in this one liner command typed in the terminal. You can select and copy-paste this snippet as-is. -
For future use, locate the application.properties file in the src/ folder and add the following content:
server.port=${PORT:8080} spring.jpa.properties.hibernate.temp.use_jdbc_metadata_defaults = false spring.jpa.database-platform=org.hibernate.dialect.PostgreSQL9Dialect -
Locate the Java file containing the main application class (
EventRegistrationApplication.java) and add the following contentpackage ca.mcgill.ecse321.eventregistration; import org.springframework.boot.autoconfigure.SpringBootApplication; import org.springframework.boot.SpringApplication; import org.springframework.web.bind.annotation.RestController; import org.springframework.web.bind.annotation.RequestMapping; @RestController @SpringBootApplication public class EventRegistrationApplication { public static void main(String[] args) { SpringApplication.run(EventRegistrationApplication.class, args); } @RequestMapping("/") public String greeting(){ return "Hello world!"; } } -
Verify that it builds with
gradle build -xtest. -
Commit and push the files of the new Spring project.
git add .
git status #verify the files that are staged for commit
git commit -m "Initial commit of the backend application"
git push
2.2. Heroku
2.2.1. Preparations
-
Sign up/log in on Heroku by visiting https://www.heroku.com/.
-
Install the command line client for Heroku: Heroku CLI
NoteThe Travis client might also be useful at later stages of the course, you can install it from here: Travis CLI -
Log in to Heroku CLI by opening a terminal an typing:
heroku login.
2.2.2. Creating a Heroku app
We are creating a Heroku application and deploying the Hello world! Spring example. Additionally, the steps below will make it possible to store multiple different applications in the same git repository and deploy them individually to Heroku. Steps will be shown through the example EventRegistration application, and should be adapted in the course project.
|
Note
|
All actions described here for configuring Heroku applications using the Heroku CLI could also be done via the web UI. |
-
Once you are logged in with the Heroku-CLI, create a new Heroku application: in the root of the git repository of your repository (assumed to be ~/git/eventregistration), issue
heroku create eventregistration-backend-<UNIQUE_ID> -nto create an application named "eventregistration-backend-<UNIQUE_ID>".NoteIn Heroku, the application name should be unique Heroku-wise, that is, each application in Heroku’s system should have a unique name. If you don’t provide a name parameter for the command, Heroku will randomly generate one. -
Add the multi procfile and Gradle buildpacks to the app.
heroku buildpacks:add -a eventregistration-backend-<UNIQUE_ID> https://github.com/heroku/heroku-buildpack-multi-procfile heroku buildpacks:add -a eventregistration-backend-<UNIQUE_ID> heroku/gradleCautionOrder is important.
2.2.3. Adding a database to the application
-
Open the Heroku applications web page and go to Resources, then add the Heroku Postgres add-on.
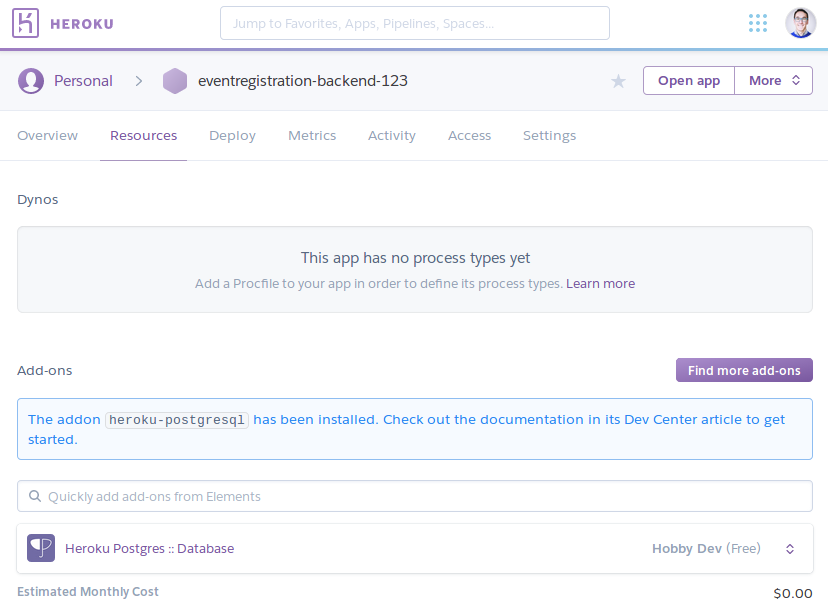
-
Click the entry for Postgres within the list of add-ons, then go to Settings. You can see the database credentials there.
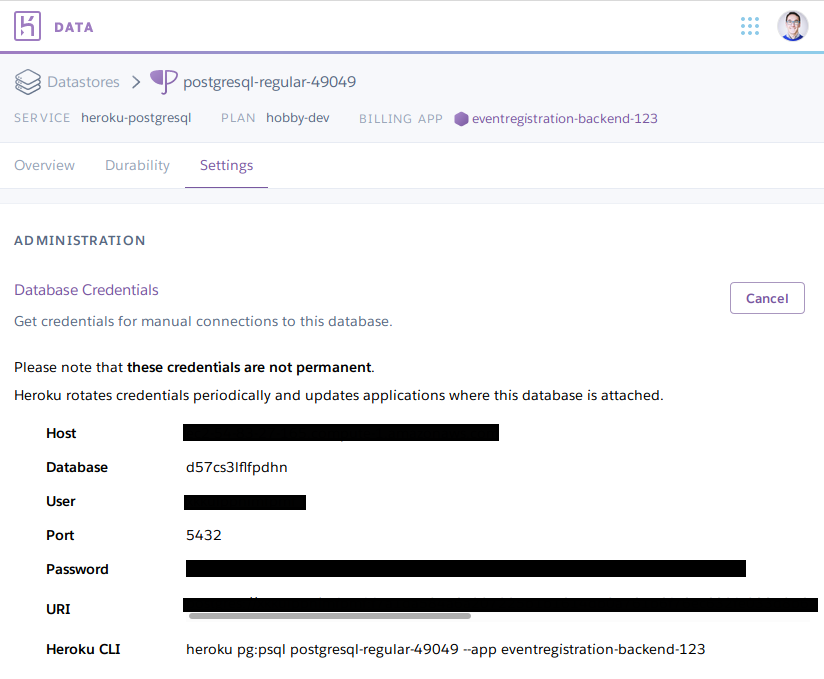 Note
NoteThe credentials are periodically updated and changed by Heroku, so make sure that you are using the actual credentials when manually connecting to the database. (E.g., during manual testing.)
2.2.4. Extending the build for the Heroku deployment environment
-
Before deploying, a top level build.gradle and settings.gradle need to be created in the root of the repository (i.e., in ~/git/eventregistration)
build.gradle:task stage () { dependsOn ':EventRegistration-Backend:assemble' }settings.gradle:
include ':EventRegistration-Backend' -
Generate the Gradle wrapper with the newest Gradle version
gradle wrapper --gradle-version 5.1.1 -
Create a .gitignore file for the .gradle folder:
.gitignore:.gradle/ -
Add all new files to git
git add .
git status #make sure that files in .gradle/ are not added
Expected output for
git status:On branch master Your branch is ahead of 'origin/master' by 2 commits. (use "git push" to publish your local commits) Changes to be committed: (use "git reset HEAD <file>..." to unstage) new file: .gitignore new file: gradle/wrapper/gradle-wrapper.jar new file: gradle/wrapper/gradle-wrapper.properties new file: gradlew new file: gradlew.batCommit changes:
git commit -m "Adding Gradle wrapper"
2.2.5. Supply application-specific setting for Heroku
-
Within the EventRegistration-Backend folder, create a file called Procfile (not Procfile.txt, name it exactly Procfile) with the content:
web: java -jar EventRegistration-Backend/build/libs/EventRegistration-Backend-0.0.1-SNAPSHOT.jar -
Add the Procfile to a new commit
-
Configure the multi-procfile buildpack to find the Procfile:
heroku config:add PROCFILE=EventRegistration-Backend/Procfile --app eventregistration-backend-<UNIQUE_ID>
2.2.6. Deploying the app
-
Obtain and copy the Heroku Git URL
heroku git:remote --app eventregistration-backend-<UNIQUE_ID>Output:
set git remote heroku to https://git.heroku.com/eventregistration-backend-<UNIQUE_ID>.git -
Add the
backend-herokuremote and deploy the first version of the application withgit remote add backend-heroku https://git.heroku.com/eventregistration-backend-<UNIQUE_ID>.git git push backend-heroku masterNoteIf it fails to build, make sure you try understanding the output. Typical issue: buildpacks are not added/are not in the right order. -
Visit the link provided in the build output. It may take some time (even 30-60 seconds) for the server to answer the first HTTP request, so be patient!
-
Save your work to the GitHub repository, too:
git push origin master
Final layout of the files (only two directory levels are shown):
~/git/eventregistration
├── build.gradle
├── EventRegistration-Backend
│   ├── build
│   │   ├── classes
│   │   ├── libs
│   │   ├── resources
│   │   └── tmp
│   ├── build.gradle
│   ├── gradle
│   │   └── wrapper
│   ├── gradlew
│   ├── gradlew.bat
│   ├── Procfile
│   ├── settings.gradle
│   └── src
│       ├── main
│       └── test
├── gradle
│   └── wrapper
│       ├── gradle-wrapper.jar
│       └── gradle-wrapper.properties
├── gradlew
├── gradlew.bat
├── README.md
└── settings.gradle
3. Backend with Spring and Java JPA
3.1. Description of Event Registration System
We assume that the following description is elicited from stakeholders (e.g., potential customers):
-
The Event Registration System shall provide the ability to add a person by specifying the person’s name. This feature should be available in both a Web browser and an Android application.
-
The Event Registration System shall provide the ability to add an event by specifying the event’s name, date, start time, and end time. This feature should be available in both a Web browser and an Android application.
-
The Event Registration System shall provide the ability to register a person to an event. This feature should be available in both a Web browser and an Android application.
-
The Event Registration System shall list all events in a Web browser.
-
The Event Registration System shall list all persons in a Web browser.
-
The Event Registration System shall list all events next to the person who is registered to it in a Web browser.
The target Event Registration System consists of three main components:
-
Backend: It provides the core business functionality exposed as RESTful services by using the Java Spring Framework. In addition, it connects to a database to store business data.
-
Web frontend: The web frontend needs to be developed in Vue.js, a popular framework using HTML5 and JavaScript for reactive user interfaces. The web frontend is connected to the backend via HTTP calls using the Rest API.
-
Android frontend: The same backend services will also be accessed using an Android frontend application. Similarly, the Android frontend issues HTTP calls to call the backend.
3.2. Domain modeling and code generation
3.2.1. Installing UML Lab
Go to the download page of UML Lab and install it on your machine. To activate it, use the licence key shared in the MyCourses announcement.
3.2.2. UML Lab project setup
|
Note
|
Once you start UML Lab, there are some useful tutorials that help you learn about the features of the modeling tool. Furthermore, there is an introduction on how to use and configure UML Lab among the resources of Rice University. |
-
Create a new UML Lab Java project with the name
ca.mcgill.ecse321.eventregistration.modelwith the default project settings. -
Within the project, create a linked folder (Select Project → New Folder → Click Advanced Button → select "Link to alternate location (linked folder) option) that points to the src/main/java folder of your
Eventregistration-Backendproject. Name the folder as src-gen. It will be used as the target for generating model code.
 Caution
Links to folders will not be versioned, so each team member needs to set this link individually after cloning the project. -
Open the ca.mcgill.ecse321.eventregistration.model.umlcd diagram file by double clicking it. It is an empty diagram by default.
-
Click on the empty diagram editor canvas and open the properties view and configure code generation path.
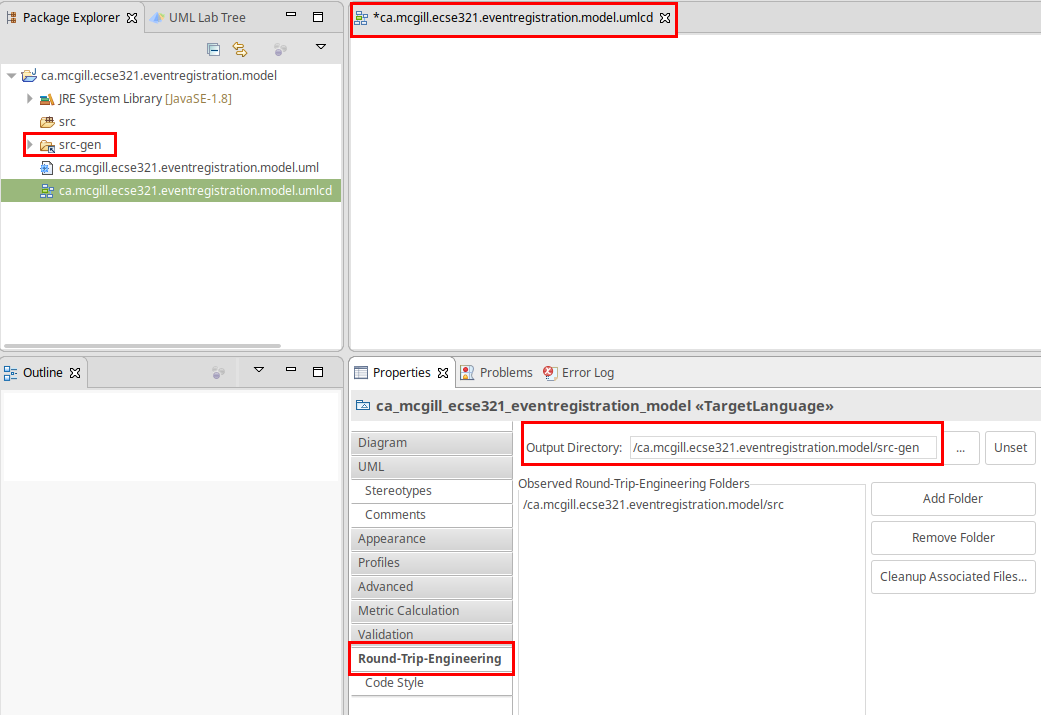
-
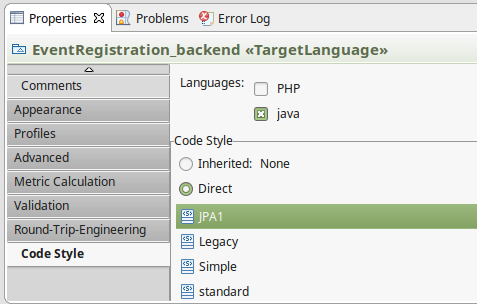
In the same Properties view, apply the Direct > JPA1 code style.
3.2.3. Domain modeling exercise: the Event Registration System
-
Using the Palette on the left hand side of the class diagram editor, create the following package structure and the
Personclass, and connect them with the Containment line. Once you save the diagram, the code should be generated to the src-gen folder (left part of the figure below).
 Note
NoteIf you disabled the automatic code generation on file save action, then you need to do right click the diagram → generate code manually. -
Study the generated
Personclass in theca/mcgill/ecse321/eventregistration/modelpackage (folder)! -
In the upcoming steps, we will use the
java.sql.Timeandjava.sql.Datedata types from the Java Runtime Library, so we need to add them to the model as datatypes.

-
Extend the diagram by adding more classes and association and composition relations as shown below. Pay extra attention to the navigability and multiplicity of the references.

-
Select attributes to be primary keys (
Person: id isname,Event: id isname,Registration: id isid)
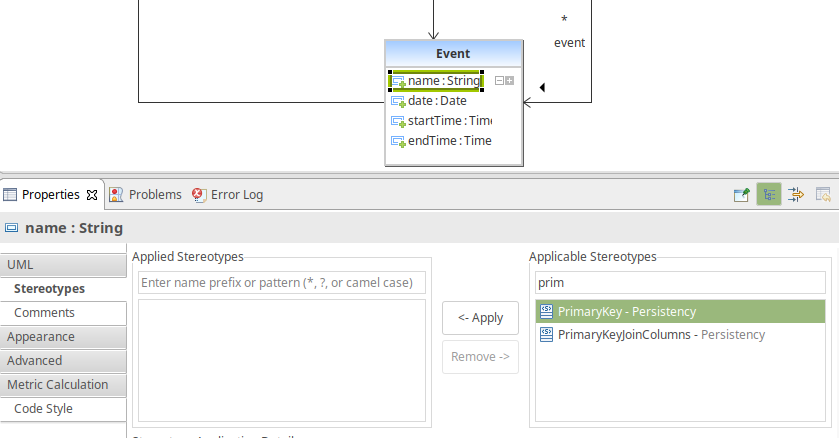 Note
NoteVerify the generated code:remove any @OneToOneannotations from getters associated withDateandTimefrom theEventclass. -
Create an extra
intattribute for theRegistrationManageras well and set it as the ID (similarly to the other three classes).CautionIf you forget to supply an ID to any of your entities, Hibernate will throw an exception and you application will fail to start. -
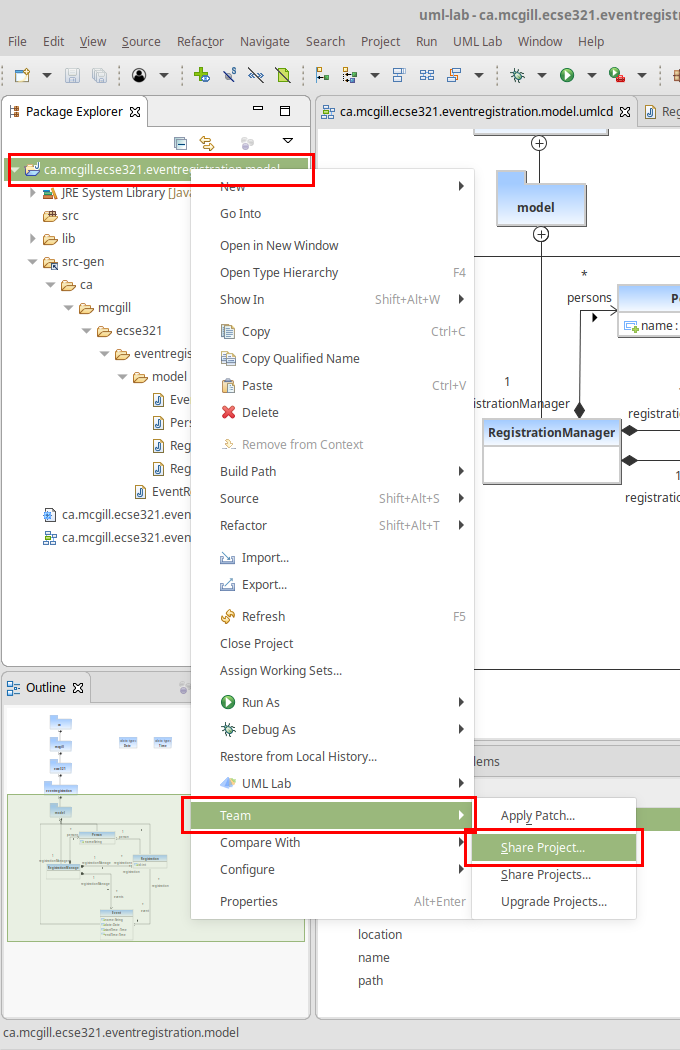
Share the modeling project to git. You can use the command line git client or EGit.
3.3. Setting up a Spring-based Backend
You can download the Spring Tools Suite IDE from here.
3.3.1. Running the Backend Application from Eclipse
-
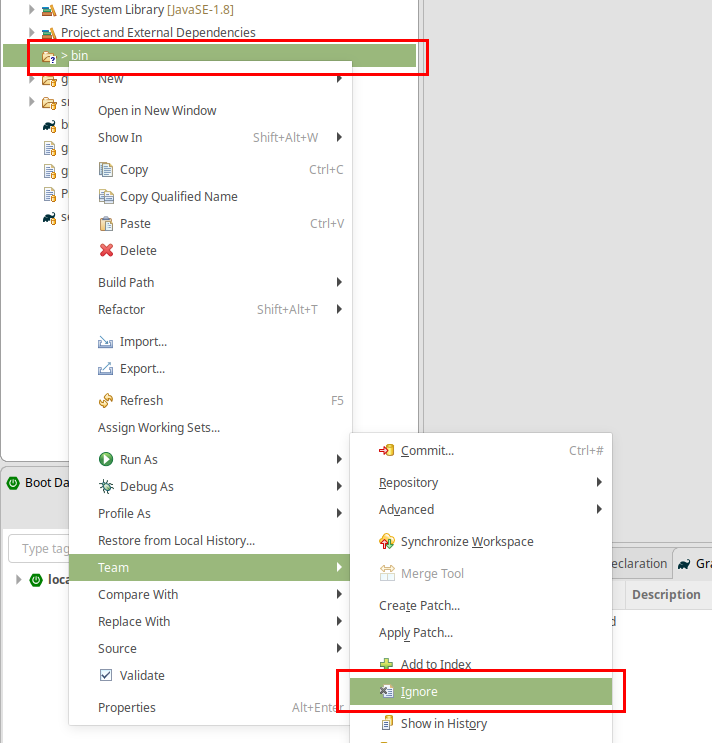
Import the EventRegistration-Backend Spring Boot project as a Gradle project from File > Import… > Gradle > Existing Gradle project using the default settings. Select the previously generated Spring project folder as the root of the project.
-
Ignore the bin folder.
-
Find the
EventRegistrationApplication.javasource file, then right click and select Run As > Spring Boot App. The application will fail to start, since the database is not yet configured, but this action will create an initial run configuration. Example console output (fragment):[...] *************************** APPLICATION FAILED TO START *************************** Description: Failed to configure a DataSource: 'url' attribute is not specified and no embedded datasource could be configured. Reason: Failed to determine a suitable driver class [...] -
Obtain the database URL to access the database remotely, e.g., by opening up a terminal and running:
heroku run echo \$JDBC_DATABASE_URL --app=<YOUR_BACKEND_APP_NAME>. -
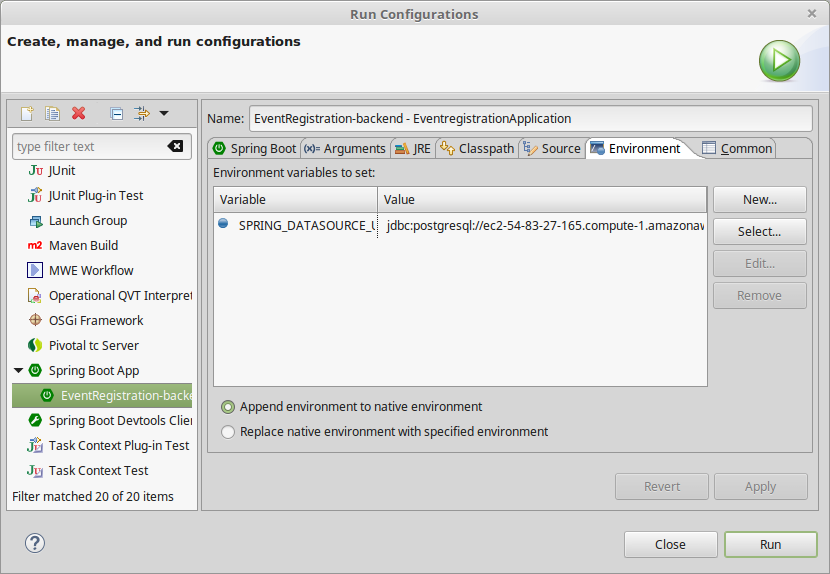
In Eclipse, open the EventRegistration-Backend - EventregistrationApplication run configuration page and add an environment variable called
SPRING_DATASOURCE_URLwith the value obtained in the previous step.
-
Add the
spring.jpa.hibernate.ddl-auto=createtoapplication.properties. The database content along with the tables this way will be deleted (as necessary) then re-created each time your application starts.ImportantIn production, the value of this property should be none(instead ofcreate). Possible values arenone,create,validate, andupdate. -
If needed: troubleshooting:
-
If you get an error message saying something similar to
createClob() is not yet implemented, then you can try setting thespring.jpa.properties.hibernate.jdbc.lob.non_contextual_creation=truevariable in yourapplication.properties. It could be a workaround a workaround for an issue with Postgres. -
Sometimes environment variables don’t work with Spring apps. In this case you can set the
spring.datasource.url, thespring.datasource.username, and thespring.datasource.passwordvariables in the application properties as an alternative to setting theSPRING_DATASOURCE_URLenvironment variable. -
Make sure no other apps are running on localhost:8080. You can test it by opening the browser and entering
localhost:8080as the address.
-
3.3.2. Spring Transactions
-
Verify the contents of the
EventRegistrationApplicationclass:package ca.mcgill.ecse321.eventregistration; import org.springframework.boot.SpringApplication; import org.springframework.boot.autoconfigure.SpringBootApplication; @RestController @SpringBootApplication public class EventRegistrationApplication { public static void main(String[] args) { SpringApplication.run(EventRegistrationApplication.class, args); } @RequestMapping("/") public String greeting() { return "Hello world!"; } } -
Create a new package in
src/main/javaand name itca.mcgill.ecse321.eventregistration.dao. -
Create the
EventRegistrationRepositoryclass within this new packagepackage ca.mcgill.ecse321.eventregistration.dao; import java.sql.Date; import java.sql.Time; import java.util.List; import javax.persistence.EntityManager; import javax.persistence.TypedQuery; import org.springframework.beans.factory.annotation.Autowired; import org.springframework.stereotype.Repository; import org.springframework.transaction.annotation.Transactional; import ca.mcgill.ecse321.eventregistration.model.Person; import ca.mcgill.ecse321.eventregistration.model.Event; @Repository public class EventRegistrationRepository { @Autowired EntityManager entityManager; @Transactional public Person createPerson(String name) { Person p = new Person(); p.setName(name); entityManager.persist(p); return p; } @Transactional public Person getPerson(String name) { Person p = entityManager.find(Person.class, name); return p; } @Transactional public Event createEvent(String name, Date date, Time startTime, Time endTime) { Event e = new Event(); e.setName(name); e.setDate(date); e.setStartTime(startTime); e.setEndTime(endTime); entityManager.persist(e); return e; } @Transactional public Event getEvent(String name) { Event e = entityManager.find(Event.class, name); return e; } } -
Add a new method that gets all events before a specified date (
deadline). Use a typed query created from an SQL command:@Transactional public List<Event> getEventsBeforeADeadline(Date deadline) { TypedQuery<Event> q = entityManager.createQuery("select e from Event e where e.date < :deadline",Event.class); q.setParameter("deadline", deadline); List<Event> resultList = q.getResultList(); return resultList; }
|
Note
|
To try the methods, you can create a JUnit test under src/test/java. Currently the methods in EventRegistrationRepository directly access the objects stored in the database via the EntityManager instance and these methods should implement both database operations and service business logic (including input validation — which we omitted in this part). In later sections, however, we will see how we can easily separate the database access and the service business logic in Spring applications.
|
3.3.3. Debugging: connecting to the database using a client
There are cases when a developer wants to know the contents of the database. In this case, a database client program can be used to access the database schema and table contents. Here are the general steps to access the Postgres database provided by Heroku:
-
Obtain the database URL to access the database remotely, e.g., by opening up a terminal and running:
heroku run echo \$JDBC_DATABASE_URL --app=<YOUR_BACKEND_APP_NAME>. -
The returned value follows the format that holds all main important parameters that are needed for accessing the database server:
jdbc:postgresql://<HOST>:<PORT>/<DATABASE_NAME>?user=<USERNAME>&password=<PASSWORD>&sslmode=requireThese parameters are:
-
Database host: the URL for the server
-
Port: the por on which the DB server is listening
-
Database name: the first section after the URL
-
Username: the first parameter value in the provided URL
-
Password: the second parameter value in the provided URL
-
-
With these parameters you can use any Postgres client you prefer to connect to the database. Here is an example for such a connection from Linux using
postgres-client:$> psql postgresql://ec2-54-243-223-245.compute-1.amazonaws.com:5432/d4412g60aaboa7?user=hdjnflfirvkmmr Password: psql (10.6 (Ubuntu 10.6-0ubuntu0.18.04.1)) SSL connection (protocol: TLSv1.2, cipher: ECDHE-RSA-AES256-GCM-SHA384, bits: 256, compression: off) Type "help" for help. d4412g60aaboa7=> \dt List of relations Schema | Name | Type | Owner --------+------------------------------------+-------+---------------- public | event | table | hdjnflfirvkmmr public | person | table | hdjnflfirvkmmr public | registration | table | hdjnflfirvkmmr public | registration_manager | table | hdjnflfirvkmmr public | registration_manager_events | table | hdjnflfirvkmmr public | registration_manager_persons | table | hdjnflfirvkmmr public | registration_manager_registrations | table | hdjnflfirvkmmr (7 rows) d4412g60aaboa7=> select * from event ; name | date | end_time | start_time ------+------------+----------+------------ e1 | 3899-10-09 | 12:00:00 | 10:00:00 (1 row) d4412g60aaboa7=> \q $>
3.4. CRUD Repositories and Services
Previously, in the ca.mcgill.ecse321.eventregistration.dao.EventRegistrationRepository class we used an instance of javax.persistence.EntityManager from Hibernate to directly to implement the required operations related to saving/retrieving data to/from a database (Create, Read, Update, and Delete operations, shortly, CRUD).
This section will introduce the Spring framework’s inbuilt support for such CRUD operations via the org.springframework.data.repository.CrudRepository interface and will show how to use such repositories to implement your use cases in so-called service classes.
If you would like to, you can obtain a version of the project that already has the changes from the previous tutorials here.
3.4.1. Creating a CRUD Repository
-
Create a new interface
PersonRepositoryin theca.mcgill.ecse321.eventregistration.daopackage and extend theCrudRepository<Person, String>interface -
Create a new method
Person findByName(String name)package ca.mcgill.ecse321.eventregistration.dao; import org.springframework.data.repository.CrudRepository; import ca.mcgill.ecse321.eventregistration.model.Person; public interface PersonRepository extends CrudRepository<Person, String>{ Person findPersonByName(String name); } -
Since Spring supports automated JPA Query creation from method names (see possible language constructs here) we don’t need to implement the interface manually, Spring JPA will create the corresponding queries runtime! This way we don’t need to write SQL queries either.
-
Create interfaces for the
EventandRegistrationclasses as well
EventRepository.java:package ca.mcgill.ecse321.eventregistration.dao; import org.springframework.data.repository.CrudRepository; import ca.mcgill.ecse321.eventregistration.model.Event; public interface EventRepository extends CrudRepository<Event, String> { Event findEventByName(String name); }RegistrationRepository.java:
package ca.mcgill.ecse321.eventregistration.dao;

import java.util.List;

import org.springframework.data.repository.CrudRepository;

import ca.mcgill.ecse321.eventregistration.model.Event;
import ca.mcgill.ecse321.eventregistration.model.Person;
import ca.mcgill.ecse321.eventregistration.model.Registration;

public interface RegistrationRepository extends CrudRepository<Registration, Integer> {

	List<Registration> findByPerson(Person personName);

	boolean existsByPersonAndEvent(Person person, Event eventName);

	Registration findByPersonAndEvent(Person person, Event eventName);

}
3.4.2. Implementing Services
We implement use-cases in service classes by using the CRUD repository objects for each data type of the domain model.
-
In src/main/java, create a new package
ca.mcgill.ecse321.eventregistration.service. -
In this package, create the
EventRegistrationServiceclass as shown belowpackage ca.mcgill.ecse321.eventregistration.service; import java.sql.Date; import java.sql.Time; import java.util.ArrayList; import java.util.List; import org.springframework.beans.factory.annotation.Autowired; import org.springframework.stereotype.Service; import org.springframework.transaction.annotation.Transactional; import ca.mcgill.ecse321.eventregistration.dao.EventRepository; import ca.mcgill.ecse321.eventregistration.dao.PersonRepository; import ca.mcgill.ecse321.eventregistration.dao.RegistrationRepository; import ca.mcgill.ecse321.eventregistration.model.Event; import ca.mcgill.ecse321.eventregistration.model.Person; import ca.mcgill.ecse321.eventregistration.model.Registration; @Service public class EventRegistrationService { @Autowired EventRepository eventRepository; @Autowired PersonRepository personRepository; @Autowired RegistrationRepository registrationRepository; @Transactional public Person createPerson(String name) { Person person = new Person(); person.setName(name); personRepository.save(person); return person; } @Transactional public Person getPerson(String name) { Person person = personRepository.findPersonByName(name); return person; } @Transactional public List<Person> getAllPersons() { return toList(personRepository.findAll()); } @Transactional public Event createEvent(String name, Date date, Time startTime, Time endTime) { Event event = new Event(); event.setName(name); event.setDate(date); event.setStartTime(startTime); event.setEndTime(endTime); eventRepository.save(event); return event; } @Transactional public Event getEvent(String name) { Event event = eventRepository.findEventByName(name); return event; } @Transactional public List<Event> getAllEvents() { return toList(eventRepository.findAll()); } @Transactional public Registration register(Person person, Event event) { Registration registration = new Registration(); registration.setId(person.getName().hashCode() * event.getName().hashCode()); registration.setPerson(person); registration.setEvent(event); registrationRepository.save(registration); return registration; } @Transactional public List<Registration> getAllRegistrations(){ return toList(registrationRepository.findAll()); } @Transactional public List<Event> getEventsAttendedByPerson(Person person) { List<Event> eventsAttendedByPerson = new ArrayList<>(); for (Registration r : registrationRepository.findByPerson(person)) { eventsAttendedByPerson.add(r.getEvent()); } return eventsAttendedByPerson; } private <T> List<T> toList(Iterable<T> iterable){ List<T> resultList = new ArrayList<T>(); for (T t : iterable) { resultList.add(t); } return resultList; } }
3.5. Unit Testing the Backend Service
-
In a fresh Spring Boot project, there is already a single test class
EventRegistrationApplicationTestsin the src/test/java folder that looks like the following:package ca.mcgill.ecse321.eventregistration; import org.junit.Test; import org.junit.runner.RunWith; import org.springframework.beans.factory.annotation.Autowired; import org.springframework.boot.test.context.SpringBootTest; import org.springframework.test.context.junit4.SpringRunner; @RunWith(SpringRunner.class) @SpringBootTest public class EventRegistrationApplicationTests { @Test public void contextLoads() { } } -
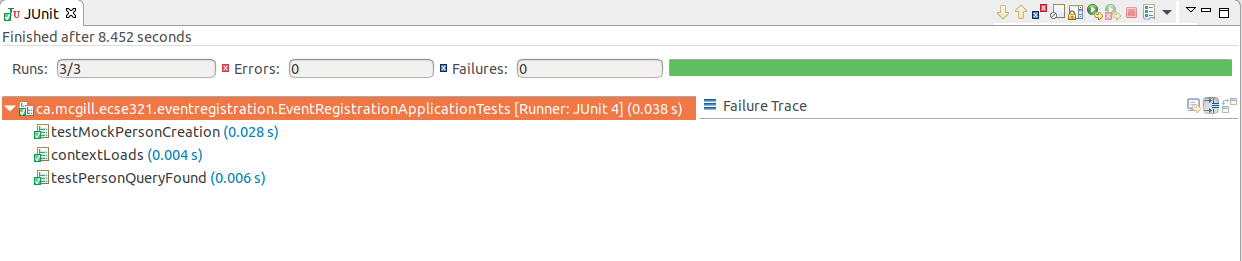
Run this test that checks if the application can successfully load by right clicking on the class → Run as… → JUnit test
ImportantYou need to set the SPRING_DATASOURCE_URLfor the test run configuration as well if you use an environment variable to set datasource URL. See step 5 in section 3.3.1. -
Add a new test class
ca.mcgill.ecse321.eventregistration.service.TestEventRegistrationServiceand implement tests for the servicepackage ca.mcgill.ecse321.eventregistration.service; import static org.junit.Assert.assertEquals; import static org.junit.Assert.fail; import java.sql.Date; import java.sql.Time; import java.time.LocalTime; import java.time.format.DateTimeFormatter; import java.util.Calendar; import java.util.List; import org.junit.After; import org.junit.Test; import org.junit.runner.RunWith; import org.springframework.beans.factory.annotation.Autowired; import org.springframework.boot.test.context.SpringBootTest; import org.springframework.test.context.junit4.SpringRunner; import ca.mcgill.ecse321.eventregistration.dao.EventRepository; import ca.mcgill.ecse321.eventregistration.dao.PersonRepository; import ca.mcgill.ecse321.eventregistration.dao.RegistrationRepository; import ca.mcgill.ecse321.eventregistration.model.Event; import ca.mcgill.ecse321.eventregistration.model.Person; @RunWith(SpringRunner.class) @SpringBootTest public class TestEventRegistrationService { @Autowired private EventRegistrationService service; @Autowired private PersonRepository personRepository; @Autowired private EventRepository eventRepository; @Autowired private RegistrationRepository registrationRepository; @After public void clearDatabase() { // Fisrt, we clear registrations to avoid exceptions due to inconsistencies registrationRepository.deleteAll(); // Then we can clear the other tables personRepository.deleteAll(); eventRepository.deleteAll(); } @Test public void testCreatePerson() { assertEquals(0, service.getAllPersons().size()); String name = "Oscar"; try { service.createPerson(name); } catch (IllegalArgumentException e) { // Check that no error occurred fail(); } List<Person> allPersons = service.getAllPersons(); assertEquals(1, allPersons.size()); assertEquals(name, allPersons.get(0).getName()); } @Test public void testCreatePersonNull() { assertEquals(0, service.getAllPersons().size()); String name = null; String error = null; try { service.createPerson(name); } catch (IllegalArgumentException e) { error = e.getMessage(); } // check error assertEquals("Person name cannot be empty!", error); // check no change in memory assertEquals(0, service.getAllPersons().size()); } // ... other tests @Test public void testRegisterPersonAndEventDoNotExist() { assertEquals(0, service.getAllRegistrations().size()); String nameP = "Oscar"; Person person = new Person(); person.setName(nameP); assertEquals(0, service.getAllPersons().size()); String nameE = "Soccer Game"; Calendar c = Calendar.getInstance(); c.set(2016, Calendar.OCTOBER, 16, 9, 00, 0); Date eventDate = new Date(c.getTimeInMillis()); Time startTime = new Time(c.getTimeInMillis()); c.set(2016, Calendar.OCTOBER, 16, 10, 30, 0); Time endTime = new Time(c.getTimeInMillis()); Event event = new Event(); event.setName(nameE); event.setDate(eventDate); event.setStartTime(startTime); event.setEndTime(endTime); assertEquals(0, service.getAllEvents().size()); String error = null; try { service.register(person, event); } catch (IllegalArgumentException e) { error = e.getMessage(); } // check error assertEquals("Person does not exist! Event does not exist!", error); // check model in memory assertEquals(0, service.getAllRegistrations().size()); assertEquals(0, service.getAllPersons().size()); assertEquals(0, service.getAllEvents().size()); } // ... other tests } -
See the complete test suite here.
-
Run the tests and interpret the test error messages! You should see only a few (at least one) tests passing.
-
Update the implementation (i.e., replace the current service method codes with the ones provided below) of the following methods with input validation in the
EventRegistrationServiceservice class to make the tests pass (Test-Driven Development)@Transactional public Person createPerson(String name) { if (name == null || name.trim().length() == 0) { throw new IllegalArgumentException("Person name cannot be empty!"); } Person person = new Person(); person.setName(name); personRepository.save(person); return person; }@Transactional public Person getPerson(String name) { if (name == null || name.trim().length() == 0) { throw new IllegalArgumentException("Person name cannot be empty!"); } Person person = personRepository.findPersonByName(name); return person; }@Transactional public Event getEvent(String name) { if (name == null || name.trim().length() == 0) { throw new IllegalArgumentException("Event name cannot be empty!"); } Event event = eventRepository.findEventByName(name); return event; }@Transactional public Event createEvent(String name, Date date, Time startTime, Time endTime) { // Input validation String error = ""; if (name == null || name.trim().length() == 0) { error = error + "Event name cannot be empty! "; } if (date == null) { error = error + "Event date cannot be empty! "; } if (startTime == null) { error = error + "Event start time cannot be empty! "; } if (endTime == null) { error = error + "Event end time cannot be empty! "; } if (endTime != null && startTime != null && endTime.before(startTime)) { error = error + "Event end time cannot be before event start time!"; } error = error.trim(); if (error.length() > 0) { throw new IllegalArgumentException(error); } Event event = new Event(); event.setName(name); event.setDate(date); event.setStartTime(startTime); event.setEndTime(endTime); eventRepository.save(event); return event; }@Transactional public Registration register(Person person, Event event) { String error = ""; if (person == null) { error = error + "Person needs to be selected for registration! "; } else if (!personRepository.existsById(person.getName())) { error = error + "Person does not exist! "; } if (event == null) { error = error + "Event needs to be selected for registration!"; } else if (!eventRepository.existsById(event.getName())) { error = error + "Event does not exist!"; } if (registrationRepository.existsByPersonAndEvent(person, event)) { error = error + "Person is already registered to this event!"; } error = error.trim(); if (error.length() > 0) { throw new IllegalArgumentException(error); } Registration registration = new Registration(); registration.setId(person.getName().hashCode() * event.getName().hashCode()); registration.setPerson(person); registration.setEvent(event); registrationRepository.save(registration); return registration; }@Transactional public List<Event> getEventsAttendedByPerson(Person person) { if (person == null ) { throw new IllegalArgumentException("Person cannot be null!"); } List<Event> eventsAttendedByPerson = new ArrayList<>(); for (Registration r : registrationRepository.findByPerson(person)) { eventsAttendedByPerson.add(r.getEvent()); } return eventsAttendedByPerson; } -
Run the tests again, and all should be green now.
3.6. RESTful Web Service for Spring Data JPA
Previously, we used CRUD repository objects for each data type of the domain model and implemented use-cases in service classes. In this section, we will Implement REST API for eventregistration (people, events and registrations) and expose Sping Data.
If you would like to, you can obtain a version of the project that already has the changes from the previous tutorials here.
3.6.1. Preliminary
-
Set database URL to start application and accessing the database remotey. You can do the same by either adding an environment variable called SPRING_DATASOURCE_URL or by specifying spring.datasource.url, spring.datasource.username, and spring.datasource.password in application.properties.
-
Add the dependency 'spring-boot-starter-data-rest' in build.gradle file of your backend. It is required to expose Spring Data repositories over REST using Spring Data REST.
implementation 'org.springframework.boot:spring-boot-starter-data-rest'
implementation 'org.springframework.boot:spring-boot-starter-data-jpa'
implementation 'org.springframework.boot:spring-boot-starter-web'

runtimeOnly 'org.postgresql:postgresql'
testImplementation 'org.springframework.boot:spring-boot-starter-test'
3.6.2. Build RESTful Web Service
We will discuss two ways to build RESTful web service for our Spring Boot project.
Build RESTful Web Service Using Controller and DTOs
-
We will first create a new package in EventRegistration-Backend and then create EventRegistrationRestController class inside it. We have added the annotation
@RestControllerabove the controller class so that HTTP requests are handled by EventRegistrationRestController. In addition, we enabled the Cross-Origin Resource Sharing at the controller level using '@CrossOrigin' notation.package ca.mcgill.ecse321.eventregistration.controller; @CrossOrigin(origins = "*") @RestController public class EventRegistrationRestController { } -
We further create another package ca.mcgill.ecse321.eventregistration.dto and create the below files inside that package. First we create EventDto.java.
package ca.mcgill.ecse321.eventregistration.dto; import java.sql.Date; import java.sql.Time; public class EventDto { private String name; private Date eventDate; private Time startTime; private Time endTime; public EventDto() { } public EventDto(String name) { this(name, Date.valueOf("1971-01-01"), Time.valueOf("00:00:00"), Time.valueOf("23:59:59")); } public EventDto(String name, Date eventDate, Time startTime, Time endTime) { this.name = name; this.eventDate = eventDate; this.startTime = startTime; this.endTime = endTime; } public String getName() { return name; } public Date getEventDate() { return eventDate; } public Time getStartTime() { return startTime; } public Time getEndTime() { return endTime; } } -
Next, we create PersonDto.java file.
package ca.mcgill.ecse321.eventregistration.dto; import java.util.Collections; import java.util.List; public class PersonDto { private String name; private List<EventDto> events; public PersonDto() { } @SuppressWarnings("unchecked") public PersonDto(String name) { this(name, Collections.EMPTY_LIST); } public PersonDto(String name, List<EventDto> arrayList) { this.name = name; this.events = arrayList; } public String getName() { return name; } public List<EventDto> getEvents() { return events; } public void setEvents(List<EventDto> events) { this.events = events; } } -
Finally, we create RegistrationDto.java file.
package ca.mcgill.ecse321.eventregistration.dto; public class RegistrationDto { private PersonDto person; private EventDto event; public RegistrationDto() { } public RegistrationDto(PersonDto person, EventDto event) { this.person = person; this.event = event; } public PersonDto getperson() { return person; } public void setperson(PersonDto person) { this.person = person; } public EventDto getEvent() { return event; } public void setEvent(EventDto event) { this.event = event; } } -
Now, we will add the methods in the controller class. Also, we will add annotaions to map web requests.
	@PostMapping(value = { "/persons/{name}", "/persons/{name}/" })
	public PersonDto createPerson(@PathVariable("name") String name) throws IllegalArgumentException {
		// @formatter:on
		Person person = service.createPerson(name);
		return convertToDto(person);
	}
@RequestMapping annotation is used to map web requests to Spring Controller methods. Since, @RequestMapping maps all HTTP operations by default. We can use @GetMapping, @PostMapping and so forth to narrow this mapping.
Moreover, in the above snippet, we use "value" and @PathVariable to bind the value of the query string parameter name into the name parameter of the createPerson() method.
-
You can add other methods similarly with appropriate mappings.
@PostMapping(value = { "/events/{name}", "/events/{name}/" })
public EventDto createEvent(@PathVariable("name") String name, @RequestParam Date date,
@RequestParam @DateTimeFormat(iso = DateTimeFormat.ISO.TIME, pattern = "HH:mm") LocalTime startTime,
@RequestParam @DateTimeFormat(iso = DateTimeFormat.ISO.TIME, pattern = "HH:mm") LocalTime endTime)
throws IllegalArgumentException {
	Event event = service.createEvent(name, date, Time.valueOf(startTime), Time.valueOf(endTime));
	return convertToDto(event);
}

@GetMapping(value = { "/events", "/events/" })
public List<EventDto> getAllEvents() {
	List<EventDto> eventDtos = new ArrayList<>();
	for (Event event : service.getAllEvents()) {
		eventDtos.add(convertToDto(event));
	}
	return eventDtos;
}

@PostMapping(value = { "/register", "/register/" })
public RegistrationDto registerPersonForEvent(@RequestParam(name = "person") PersonDto pDto,
	@RequestParam(name = "event") EventDto eDto) throws IllegalArgumentException {
	Person p = service.getPerson(pDto.getName());
	Event e = service.getEvent(eDto.getName());

	Registration r = service.register(p, e);
	return convertToDto(r, p, e);
}

@GetMapping(value = { "/registrations/person/{name}", "/registrations/person/{name}/" })
public List<EventDto> getEventsOfPerson(@PathVariable("name") PersonDto pDto) {
	Person p = convertToDomainObject(pDto);
	return createEventDtosForPerson(p);
}

@GetMapping(value = { "/events/{name}", "/events/{name}/" })
public EventDto getEventByName(@PathVariable("name") String name) throws IllegalArgumentException {
	return convertToDto(service.getEvent(name));
}

private EventDto convertToDto(Event e) {
	if (e == null) {
		throw new IllegalArgumentException("There is no such Event!");
	}
	EventDto eventDto = new EventDto(e.getName(),e.getDate(),e.getStartTime(),e.getEndTime());
	return eventDto;
}

private PersonDto convertToDto(Person p) {
	if (p == null) {
		throw new IllegalArgumentException("There is no such Person!");
	}
	PersonDto personDto = new PersonDto(p.getName());
	personDto.setEvents(createEventDtosForPerson(p));
	return personDto;
}

private RegistrationDto convertToDto(Registration r, Person p, Event e) {
	EventDto eDto = convertToDto(e);
	PersonDto pDto = convertToDto(p);
	return new RegistrationDto(pDto, eDto);
}

private Person convertToDomainObject(PersonDto pDto) {
	List<Person> allPersons = service.getAllPersons();
	for (Person person : allPersons) {
		if (person.getName().equals(pDto.getName())) {
			return person;
		}
	}
	return null;
}

private List<EventDto> createEventDtosForPerson(Person p) {
	List<Event> eventsForPerson = service.getEventsAttendedByPerson(p);
	List<EventDto> events = new ArrayList<>();
	for (Event event : eventsForPerson) {
		events.add(convertToDto(event));
	}
	return events;
}
3.6.3. Test the Service
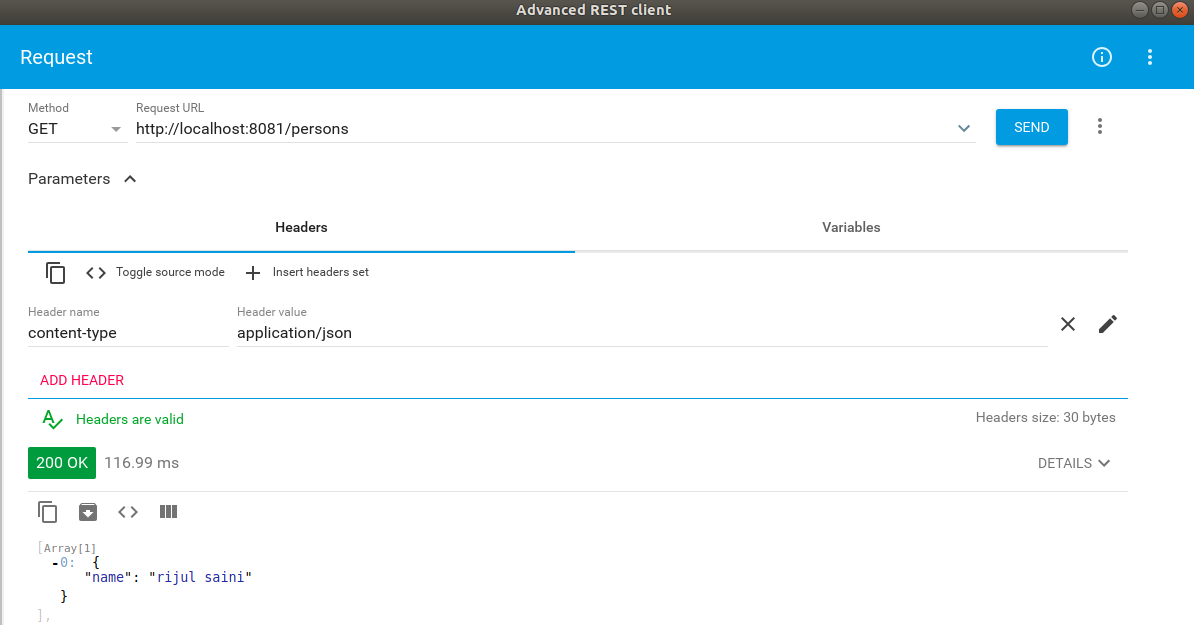
We can test the application using, e.g., the RESTClient browser plugin, Advanced Rest Client, Postman or curl.
Once you launch the client, you can specify the path and select the method as shown in the below figures.
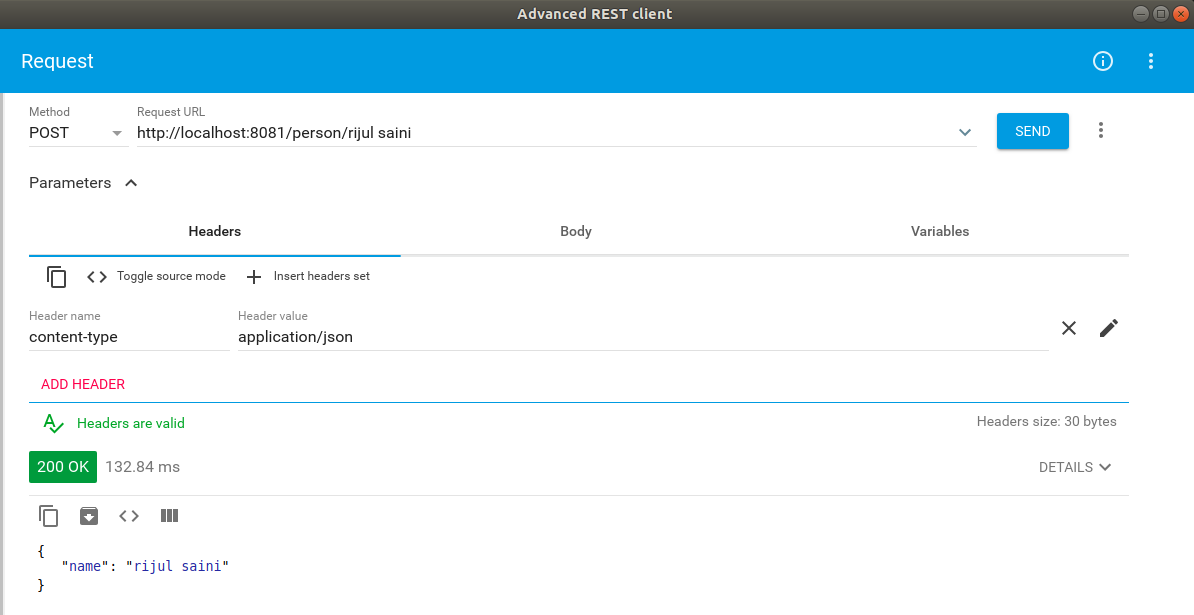
Once we use POST, the record is persisted and then we can use the GET method to retrive the same.
Similary, we can test the other methods.
3.6.4. Build RESTful Web Service With Spring Data
The advantage of using Spring Data Rest is that it can remove a lot of boilerplate that’s natural to REST services. Spring would automatically create endpoints like /events, /people as we saw above and these endpoints can be further customized.
-
We have already added the dependency 'spring-boot-starter-data-rest' in preliminary section to to expose Spring Data repositories over REST using Spring Data REST.
-
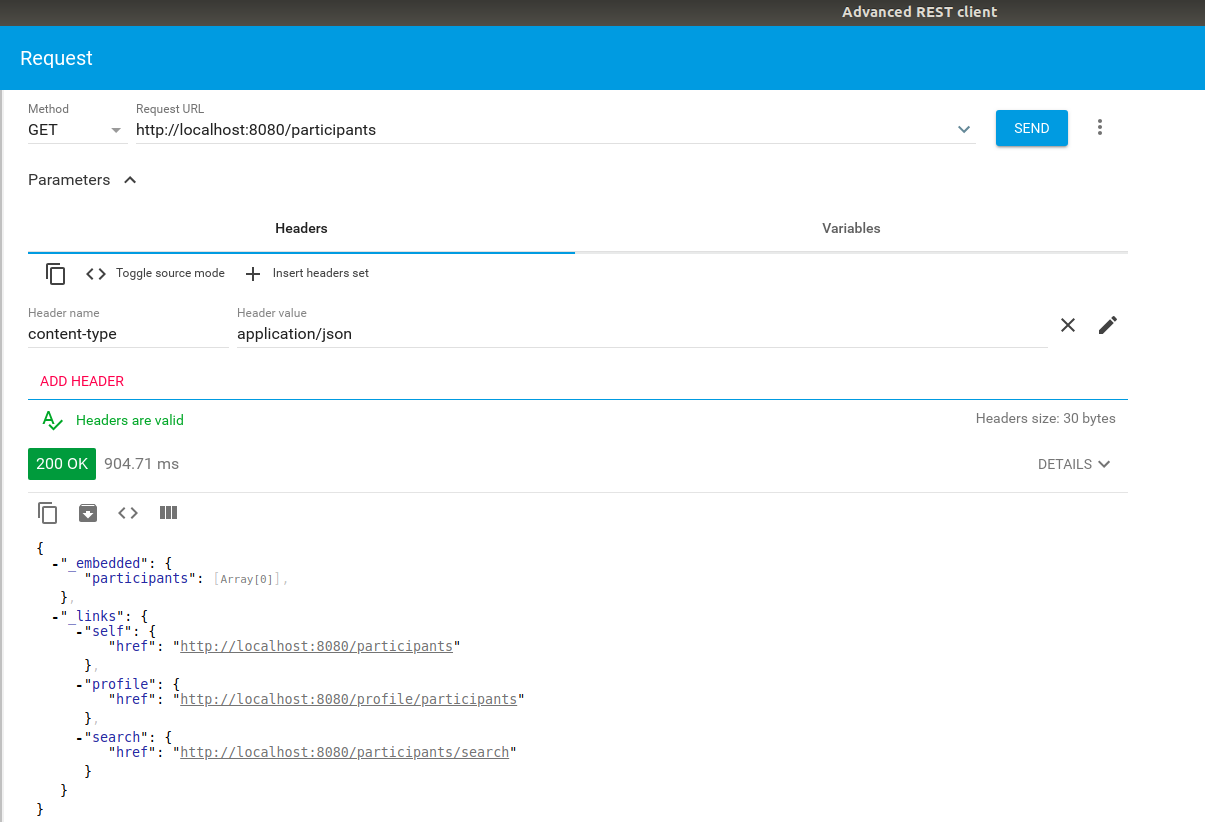
Next, we can go to repository interfaces and add @RepositoryRestResource annotaion.
@RepositoryRestResource(collectionResourceRel = "participants", path = "participants") public interface PersonRepository extends CrudRepository<Person, String>{ Person findPersonByName(String name); } -
Finally, we can access this REST API in the browser or REST Client and will receive the JSON as shown below.
3.7. Testing Backend Services
We implement a first unit test for testing the application service logic.
3.7.1. Preparations
-
Open the project and ensure that you add JUnit 5 and Mockito 2+ to the project dependencies in
build.gradle:dependencies { // Add these lines to the dependency configuration, don't replace the existing dependencies testImplementation "junit:junit:4.12" testRuntime('org.junit.jupiter:junit-jupiter-engine:5.3.1') testImplementation('org.mockito:mockito-core:2.+') testImplementation('org.mockito:mockito-junit-jupiter:2.18.3') }NoteFinding configuration settings for your Gradle/Maven project is very simple by searaching for them on MVNRepository: https://mvnrepository.com/ -
If you also would like to run your project from Eclipse, add an additional dependency:
testImplementation group: 'org.junit.platform', name: 'junit-platform-launcher', version: "1.3.1" -
Create a test class (in case you don’t already have one)
EventregistrationServiceTestsin the corresponding package undersrc/test/java:package ca.mcgill.ecse321.eventregistration; @RunWith(MockitoJUnitRunner.class) public class EventregistrationServiceTests { } -
Build your project to ensure its dependencies are correctly loaded.
3.7.2. Writing tests
-
Add the following imports to the test class:
import org.junit.Before; import org.junit.Test; import org.junit.runner.RunWith; import org.mockito.InjectMocks; import org.mockito.Mock; import org.springframework.boot.test.context.SpringBootTest; import ca.mcgill.ecse321.eventregistration.dao.EventRepository; import ca.mcgill.ecse321.eventregistration.dao.PersonRepository; import ca.mcgill.ecse321.eventregistration.dao.RegistrationRepository; import ca.mcgill.ecse321.eventregistration.service.EventRegistrationService; import org.mockito.invocation.InvocationOnMock; import org.springframework.test.context.junit4.SpringRunner; import ca.mcgill.ecse321.eventregistration.controller.EventRegistrationRestController; import ca.mcgill.ecse321.eventregistration.model.Person; -
Add the following static imports for methods:
import static org.junit.Assert.assertEquals; import static org.junit.Assert.assertNotNull; import static org.mockito.ArgumentMatchers.anyString; import static org.mockito.Mockito.mock; import static org.mockito.Mockito.when; -
Create the DAO mock for person
@Mock private PersonRepository personDao; @InjectMocks private EventRegistrationService service; private static final String PERSON_KEY = "TestPerson"; private static final String NONEXISTING_KEY = "NotAPerson"; @Before public void setMockOutput() { when(personDao.findPersonByName(anyString())).thenAnswer( (InvocationOnMock invocation) -> { if(invocation.getArgument(0).equals(PERSON_KEY)) { Person person = new Person(); person.setName(PERSON_KEY); return person; } else { return null; } }); } -
Add test cases
@Test public void testCreatePerson() { assertEquals(0, service.getAllPersons().size()); String name = "Oscar"; try { person = service.createPerson(name); } catch (IllegalArgumentException e) { // Check that no error occurred fail(); } assertEquals(name, person.getName()); } @Test public void testCreatePersonNull() { String name = null; String error = null; try { person = service.createPerson(name); } catch (IllegalArgumentException e) { error = e.getMessage(); } // check error assertEquals("Person name cannot be empty!", error); } -
Run the tests with
gradle testfrom the command line in the root of the project, or in Eclipse, right click on the test class name then select Run As… > JUnit test.
3.8. Code Coverage using EclEmma
This tutorial covers the basics of EclEmma and retrieves code coverage metrics using it.
3.8.1. Preliminary
-
Install EclEmma as a plugin in your Eclipse IDE from here.
3.8.2. Creating a Gradle Project
|
Note
|
We will create a Gradle project from scratch and be testing a simple method returnAverage(int[], int, int, int) . |
-
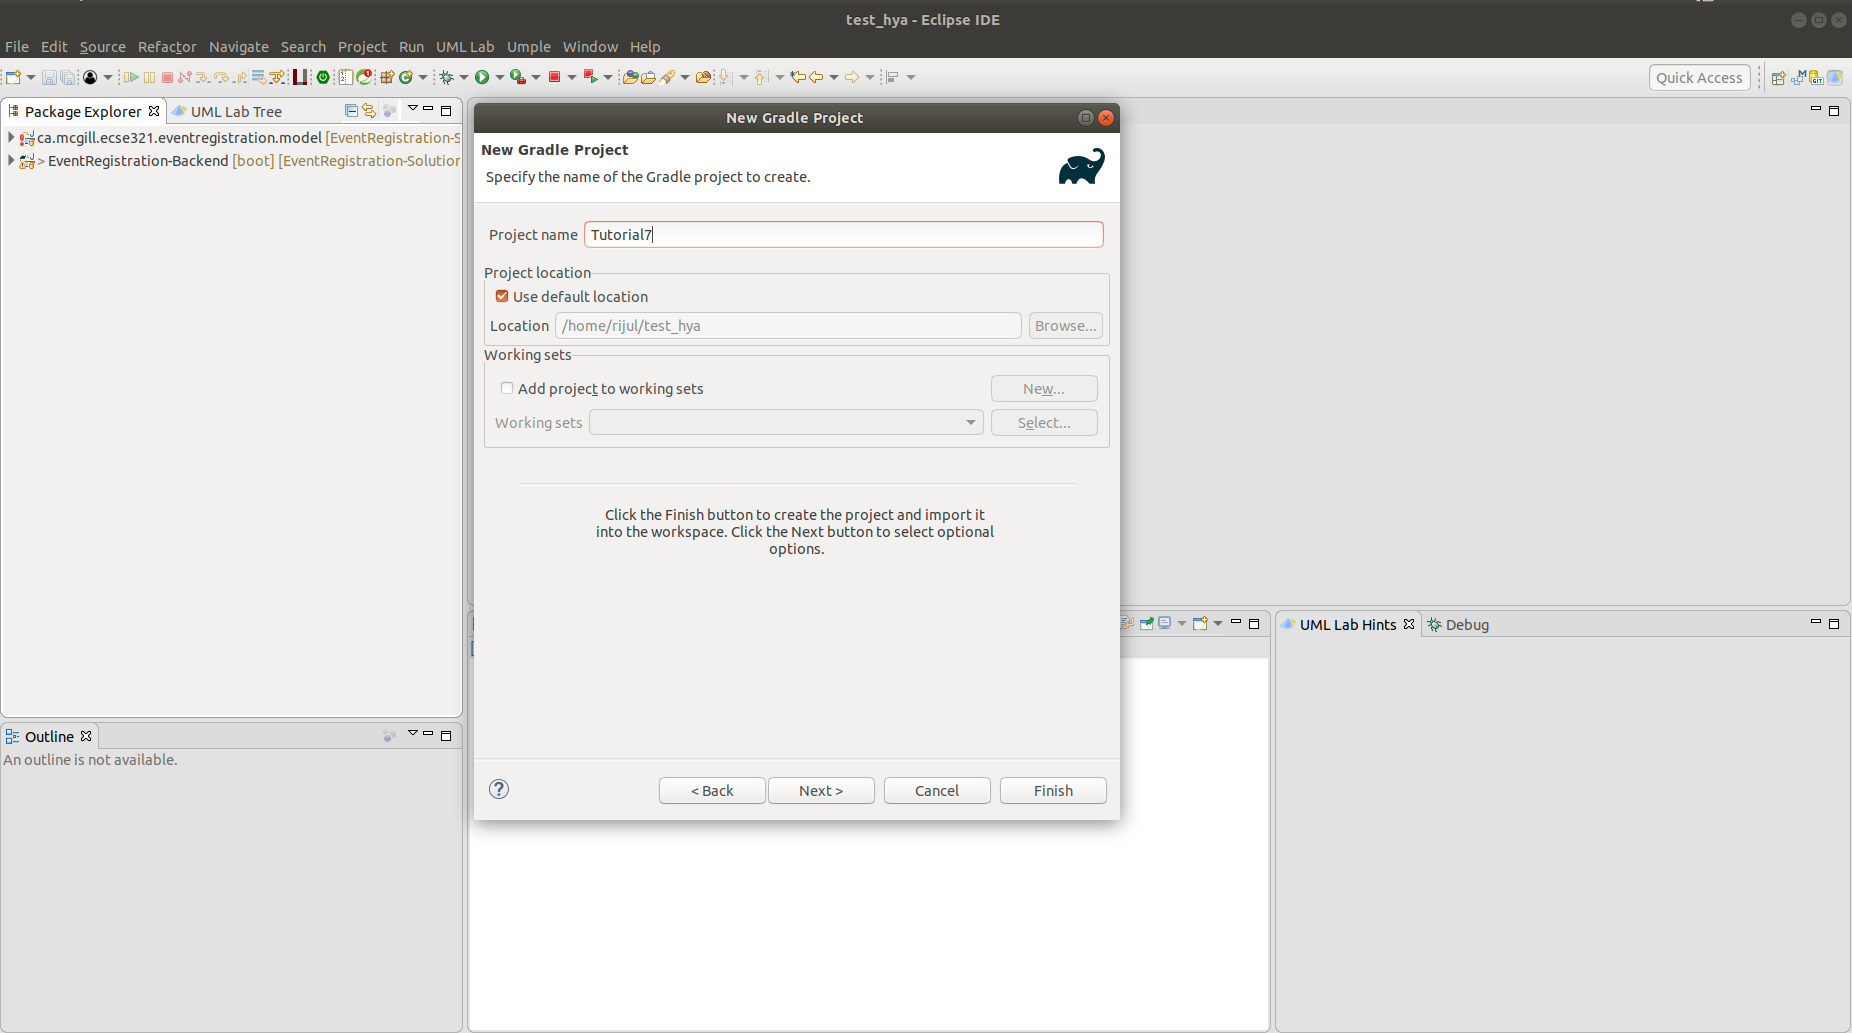
Create a new Gradle project in Eclipse by clicking on File > New > Other
-
Under Gradle, choose Gradle Project
-
Click on Next, then name your project tutorial7, click on Finish
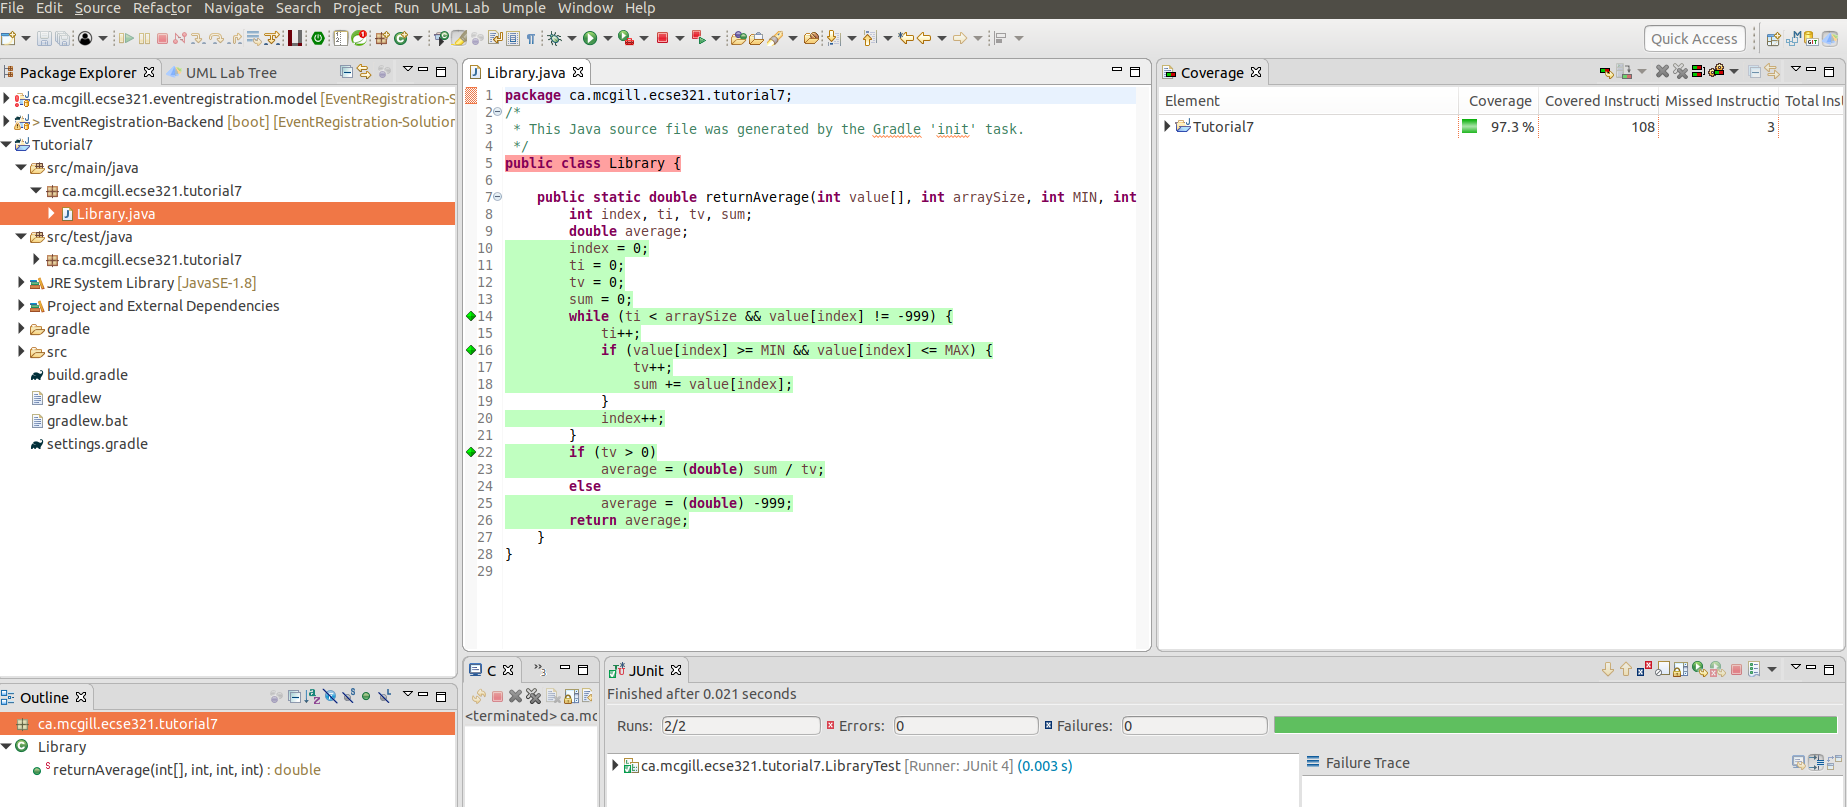
 Note
NoteThe project may take some time to be created. -
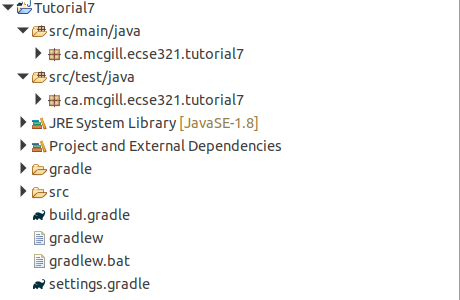
Create a new package instead of the default ones for both the source and test folders (e.g
ca.mcgill.ecse321.tutorial7) and move the default generated classes (LibraryandLibraryTest) to this package.
-
Change the code in the
Libraryclasspackage ca.mcgill.ecse321.tutorial7; public class Library { public static double returnAverage(int value[], int arraySize, int MIN, int MAX) { int index, ti, tv, sum; double average; index = 0; ti = 0; tv = 0; sum = 0; while (ti < arraySize && value[index] != -999) { ti++; if (value[index] >= MIN && value[index] <= MAX) { tv++; sum += value[index]; } index++; } if (tv > 0) average = (double) sum / tv; else average = (double) -999; return average; } } -
Change the code in the
LibraryTestclasspackage ca.mcgill.ecse321.tutorial7; import static org.junit.Assert.assertEquals; import org.junit.Test; public class LibraryTest { @Test public void allBranchCoverageMinimumTestCaseForReturnAverageTest1() { int[] value = {5, 25, 15, -999}; int AS = 4; int min = 10; int max = 20; double average = Library.returnAverage(value, AS, min, max); assertEquals(15, average, 0.1); } @Test public void allBranchCoverageMinimumTestCaseForReturnAverageTest2() { int[] value = {}; int AS = 0; int min = 10; int max = 20; double average = Library.returnAverage(value, AS, min, max); assertEquals(-999.0, average, 0.1); } }
3.8.3. Retrieving Test Coverage Metrics
|
Note
|
We can straightforwardly manage code coverage using JaCoCo inside Eclipse with no configuration if we are using EclEmma Eclipse plugin. |
-
Run the Test in coverage mode using Eclemma. Click on LibraryTest, Coverage As, 1 JUnit Test
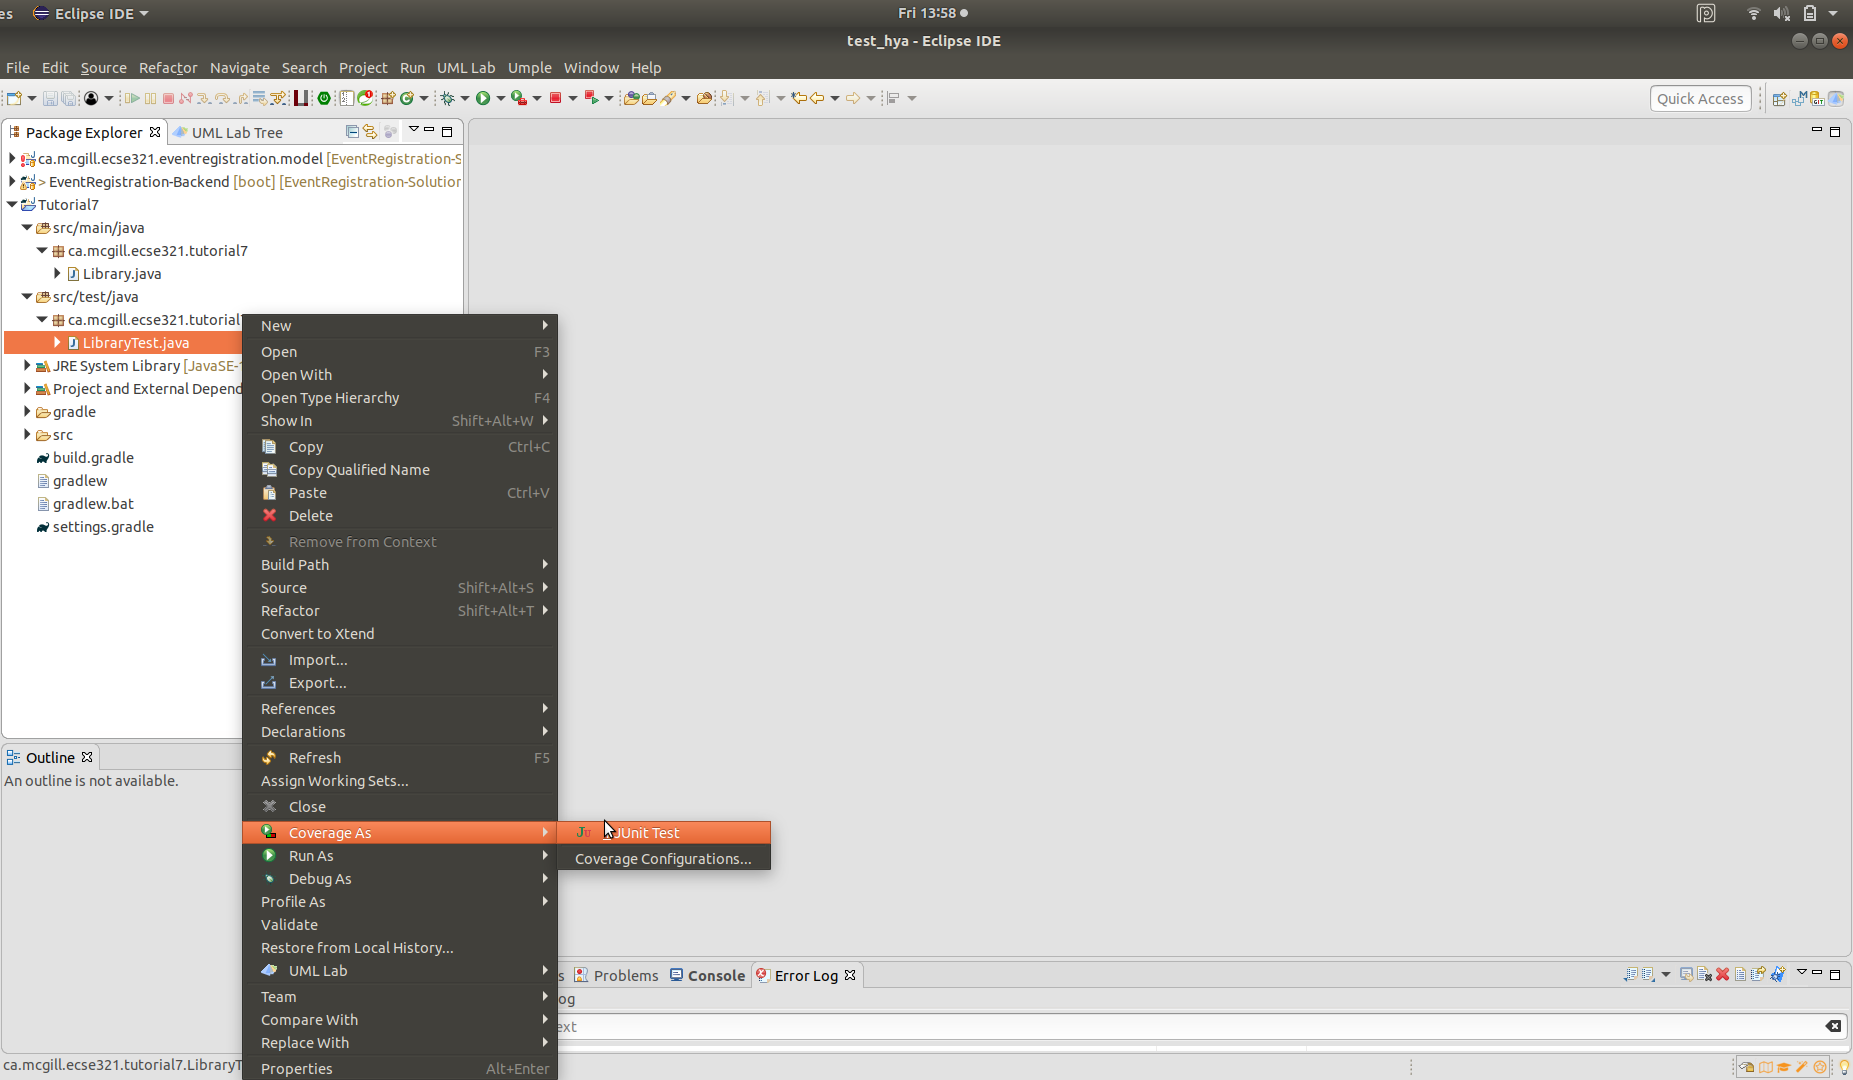
-
Verify that we have 100% branch coverage.
4. Web Frontend
4.1. Installation Instructions: Vue.js
Vue.js is a popular web frontend for building user interfacs in Javascript, which is considered to be easier to learn compared to React and Angular.
4.1.1. Install Vue.js
You can skip these first steps since you are recommended to use the VirtualBox image distributed.
-
Open a shell (or run cmd.exe in Windows)
-
Check that you successfully installed node.js and npm e.g. by checking their versions:
$ node -v v8.10.0 $ npm -v 3.5.2 -
Install the command line interface (CLI) for Vue:
npm install --global vue-cli
4.1.2. Generate initial Vue.js project content
-
Navigate to your local Git repository of the Event Registration System
$ cd ~/git/eventregistration
-
Generate initial content as follows
-
Hit Enter after each line if not indicated otherwise
-
Detailed instructions at https://github.com/vuejs-templates/webpack and https://bootstrap-vue.js.org/docs
$ vue init bootstrap-vue/webpack EventRegistration-Web
? Project name (EventRegistration-Web) EventRegistration-Frontend
? Project description (A Vue.js project) A Vue.js frontend for Event Registration App
? Author (varrodan <daniel.varro@gmail.com>)
? Vue build (Use arrow keys):
> Runtime + Compiler
  Runtime-only
? Install vue-router (Y/n): Y
? Use ESLint to lint your code (Y/n): n
? Setup unit tests with Karma + Mocha (Y/n) n
? Setup e2e tests with Nightwatch (Y/n) Y

vue-cli · Generated "EventRegistration-Web".
-
-
Now execute the following commands (one after the other)
$ cd EventRegistration-Web $ npm install $ npm run dev -
As a result A sample web page should appear at http://localhost:8080/
-
You can stop this development server by pressing Ctrl+C in the shell
-
Install Axios (for later use):
npm install --save axios
4.1.3. Setting up your development server
-
We change the default port to 8087 (instead of the default 8080) and the default IP address by using a configuration file. The rationale behind this step is that other Tomcat servers may already listen at the default localhost:8080 port which may clash with our development server.
-
Open ./config/index.js and add
port: 8087tomodule.exports(bothbuildanddevpart)-
The development server is set up at localhost, i.e. http://127.0.0.1:8087
-
The production server is set up in accordance with the virtual machines
-
We also store the host IP address and port of the backend server in similar environment variables (
backendHostandbackendPort).module.exports = { build: { env: require('./prod.env'), host: 'eventregistration-frontend-123.herokuapp.com', port: 443, backendHost: 'eventregistration-backend-123.herokuapp.com', backendPort: 443, //... }, dev: { env: require('./dev.env'), host: '127.0.0.1', port: 8087, backendHost: '127.0.0.1', backendPort: 8080, //... } }
-
-
Open ./build/dev-server.js, and change the
uriassignment as follows:-
The original line of code can be commented or deleted.
//var uri = 'http://localhost:' + port
var host = config.dev.host
var uri = 'http://' + host + ':' + port
-
-
Start again your development server by
npm run dev. The same web application should now appear at http://127.0.0.1:8087/ -
Stop the development server by Ctrl+C.
4.1.4. Commit your work to Github
-
If everything works then commit your work to your team-specific Github repository (at https://github.mcgill.ca).
-
Notice that many libraries and files are omitted, which is intentional. Check the
.gitignorefile for details.
4.2. Create a Static Vue.js Component
Vue.js promotes the use of components which encapsulate GUI elements and their behavior in order to build up rich user interfaces in a modular way. A component consists of
-
template: A template of (a part of) an HTML document enriched with data bindings, conditional expressions, loops, etc.
-
script: The behavior of the user interface programmed in JavaScript.
-
style: The customized graphical appearance of HTML document elements.
We will first create a new Vue.js component and then connect it to a backend Java Spring service via a Rest API call.
4.2.1. Create a component file
-
Create a new file EventRegistration.vue in ./src/components with the following initial content:
<template> </template> <script> </script> <style> </style> -
Create some static HTML content of the template part starting with a
<div>element corresponding to your component. We<template> <div id="eventregistration"> <h2>People</h2> <table> <tr> <td>John</td> <td>Event to attend</td> </tr> <tr> <td> <input type="text" placeholder="Person Name"> </td> <td> <button>Create</button> </td> </tr> </table> <p> <span style="color:red">Error: Message text comes here</span> </p> </div> </template> -
Customize the
<style>part with your designated CSS content. A detailed CSS reference documentation is available at https://www.w3schools.com/CSSref/. The final result of that part should like as follows.<style> #eventregistration { font-family: 'Avenir', Helvetica, Arial, sans-serif; color: #2c3e50; background: #f2ece8; } </style>
4.2.2. Create a new routing command
-
We need to route certain HTTP calls to a specific URL to be handled by EventRegistration.vue.
-
Open ./router/index.js and add a new route by extending the existing
routesproperty.export default new Router({ routes: [ { path: '/', name: 'Hello', component: Hello }, { path: '/app', name: 'EventRegistration', component: EventRegistration } ] })-
You should not change the number of spaces used as indentation otherwise you get error messages.
-
Import the new component
EventRegistration.vueat the beginning of ./router/index.js after all existing imports!// add import after all existing imports import EventRegistration from '@/components/EventRegistration'
-
-
Start the development server and navigate your browser to http://127.0.0.1:8087/#/app. Your new Vue.js component should be rendered (with the static HTML content).
4.3. Vue.js Components with Dynamic Content
4.3.1. Add data and event handlers
Next we add event handling and dynamic content to our EventRegistration.vue component.
-
Create another file registration.js in the same folder which will contain the Javascript code for the EventRegistration.vue component.
-
Create constructor methods:
function PersonDto (name) { this.name = name this.events = [] } function EventDto (name, date, start, end) { this.name = name this.eventDate = date this.startTime = start this.endTime = end } -
Add data variables to the export declaration of the component.
export default { name: 'eventregistration', data () { return { people: [], newPerson: '', errorPerson: '', response: [] } }, //... } -
Add an initialization function below the data part.
created: function () { // Test data const p1 = new PersonDto('John') const p2 = new PersonDto('Jill') // Sample initial content this.people = [p1, p2] }, -
Add event handling method createPerson():
methods: {
  createPerson: function (personName) {
    // Create a new person and add it to the list of people
    var p = new PersonDto(personName)
    this.people.push(p)
    // Reset the name field for new people
    this.newPerson = ''
  }
}
4.3.2. Create dynamic data bindings
-
Open
EventRegistration.vueand link the Javascript file as script:<script src="./registration.js"> </script> -
Change the static template content for the person list to dynamic bindings:
-
We iterate along all people in data property
peopleand dynamically print their name by{{ person.name }}(see list rendering) -
We print the (currently empty) list of events to which a person is registered to.
<table>
  <tr v-for="person in people" >
      <td>{{ person.name }}</td>
      <td>
        <ul>
          <li v-for="event in person.events">
            {{event.name}}
          </li>
        </ul>
      </td>
  </tr>
<!-- ... -->
</table>
-
-
Link input field content with data variable
newPersonand button clicks for Create Person for event handler methodcreatePerson().<table> <!-- ... --> <tr> <td> <input type="text" v-model="newPerson" placeholder="Person Name"> </td> <td> <button @click="createPerson(newPerson)">Create Person</button> </td> </tr> </table> -
Bind the error message to the corresponding variable
errorPersonby extending the<span>tag with conditional rendering.-
The error message will only appear if the data property
errorPersonis not empty. -
You may wish to further refine error handling in case of empty string content for
newPersonby adding&& !newPersonto the condition.<span v-if="errorPerson" style="color:red">Error: {{errorPerson}} </span>
-
-
Run your frontend application and observe that two people are listed.
4.4. Calling Backend Services
Next we change our frontend to issue calls to the backend via the Rest API provided by the Java Spring framework. Please refer to the section 3.6.2 where we enabled the Cross-Origin Resource Sharing at the controller level using '@CrossOrigin' notation.
4.4.1. Calling backend services in from Vue.js components
We need to modify our frontend to make calls to backend services.
-
Open registration.js and add the following content to the beginning:
-
Note that instead of hard-wired IP addresses and ports, details are given in a configuration file.
import axios from 'axios'
var config = require('../../config')

var frontendUrl = 'http://' + config.dev.host + ':' + config.dev.port
var backendUrl = 'http://' + config.dev.backendHost + ':' + config.dev.backendPort

var AXIOS = axios.create({
  baseURL: backendUrl,
  headers: { 'Access-Control-Allow-Origin': frontendUrl }
})
-
-
Now navigate to the created function, and replace existing content with the following lines:
created: function () { // Initializing people from backend AXIOS.get(`/persons`) .then(response => { // JSON responses are automatically parsed. this.people = response.data }) .catch(e => { this.errorPerson = e; }); } -
Navigate to the createPerson() method and change its content as follows:
createPerson: function (personName) { AXIOS.post(`/persons/`+personName, {}, {}) .then(response => { // JSON responses are automatically parsed. this.people.push(response.data) this.newPerson = '' this.errorPerson = '' }) .catch(e => { var errorMsg = e.message console.log(errorMsg) this.errorPerson = errorMsg }); } -
Run the frontend application and check that
-
New people can be added
-
They immediately appear in the people list.
-
4.5. Build and Travis-CI
The project should build using npm run build. This will create a build/ directory in the frontend folder, where you can run the frontend server using node build/dev-server.js.
Travis-CI supports building nodejs projects. However, we do not want to run the default npm test command. Instead, the build should do npm install and npm run build only.
4.6. Additional steps in the tutorial
4.6.1. Steps to complete
The description of the next steps is intentionally high-level and sketchy to force you to face and solve several emerging problems.
You need to provide the following functionality by extending the Vue.js component:
-
List all events (name, date, startTime, endTime)
-
Introduce an array events in the frontend data store
-
Call the appropriate backend service to fill the contents
-
Provide a dynamic list in the component and bind it to events
-
-
Create a new event (name, date, startTime, endTime)
-
Introduce an object newEvent in the frontend data store with four properties (e.g. name, date, startTime, endTime).
-
Set the initial values of these properties to something
-
-
Provide a button to initiate creating a new event
-
Provide HTML input fields to set event details
-
Create a call to the appropriate backend service, i.e. createEvent()
-
Introduce an object errorEvent for error message related to event creation
-
Provide corresponding HTML field for displaying the error message (e.g.
<span>), and set its appearance condition to the content of the error message -
Hint: you can use the following input types for setting date and time
<input type="date" v-model="newEvent.eventDate" placeholder="YYYY-MM-DD">
<input type="time" v-model="newEvent.startTime" placeholder="HH:mm">
-
-
Register a person to an event (when a new event should occur in the list of events printed next to a person)
-
Provide a selection of people
-
You need a corresponding data variable (e.g. selectedPerson)
-
You can use the HTML
<select v-model="selectedPerson">tag where each option (<option>tag withv-forVue.js parameter) is filled dynamically from the list of people. -
Hint: You can add a first disabled option as follows:
<option disabled value="">Please select one</option>
-
-
Provide a selection of events in a similar way.
-
Provide a button to initiate registration
-
Enable the button only if both a person and an event are selected
-
-
In all use cases,
-
Report application specific errors if the backend service fails
-
Prevent to enter invalid data to backend
-
4.6.2. Further documentation
-
Vue.js guide: https://vuejs.org/v2/guide/
-
Vue.js API: https://vuejs.org/v2/api/
-
Build commands: http://vuejs-templates.github.io/webpack/commands.html
-
Vue.js and Webpack integration: http://vuejs-templates.github.io/webpack/env.html
-
Html-Webpack: https://github.com/jantimon/html-webpack-plugin
-
Vue Router: https://github.com/vuejs/vue-router
-
Vue Router tutorial: https://scotch.io/tutorials/getting-started-with-vue-router
5. Android Frontend
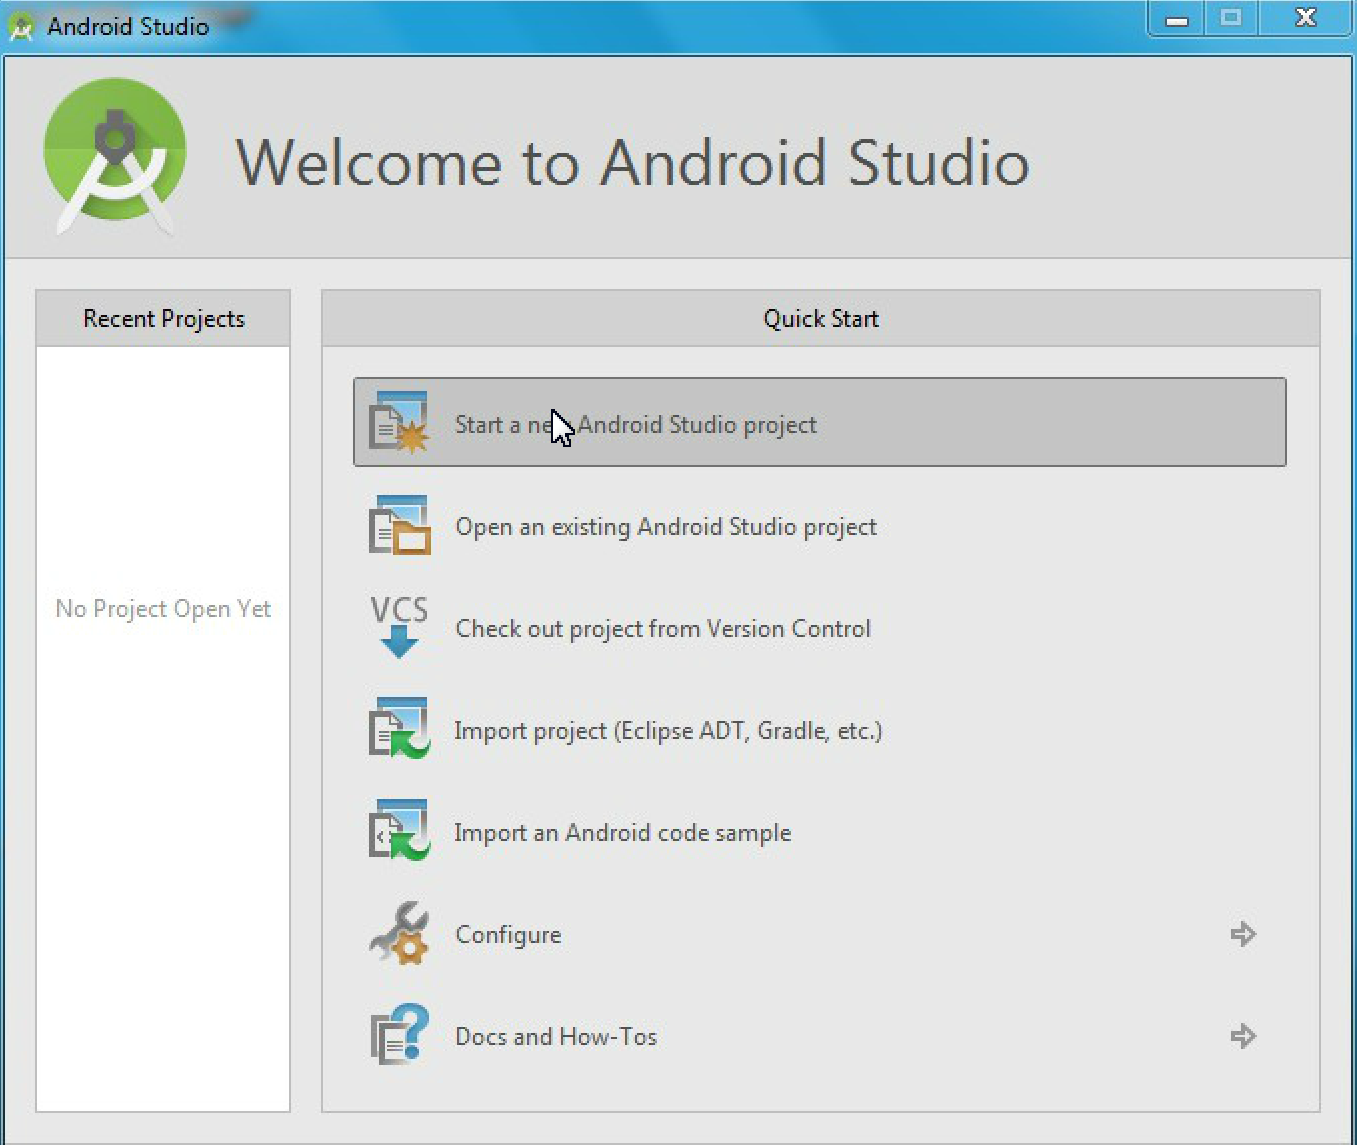
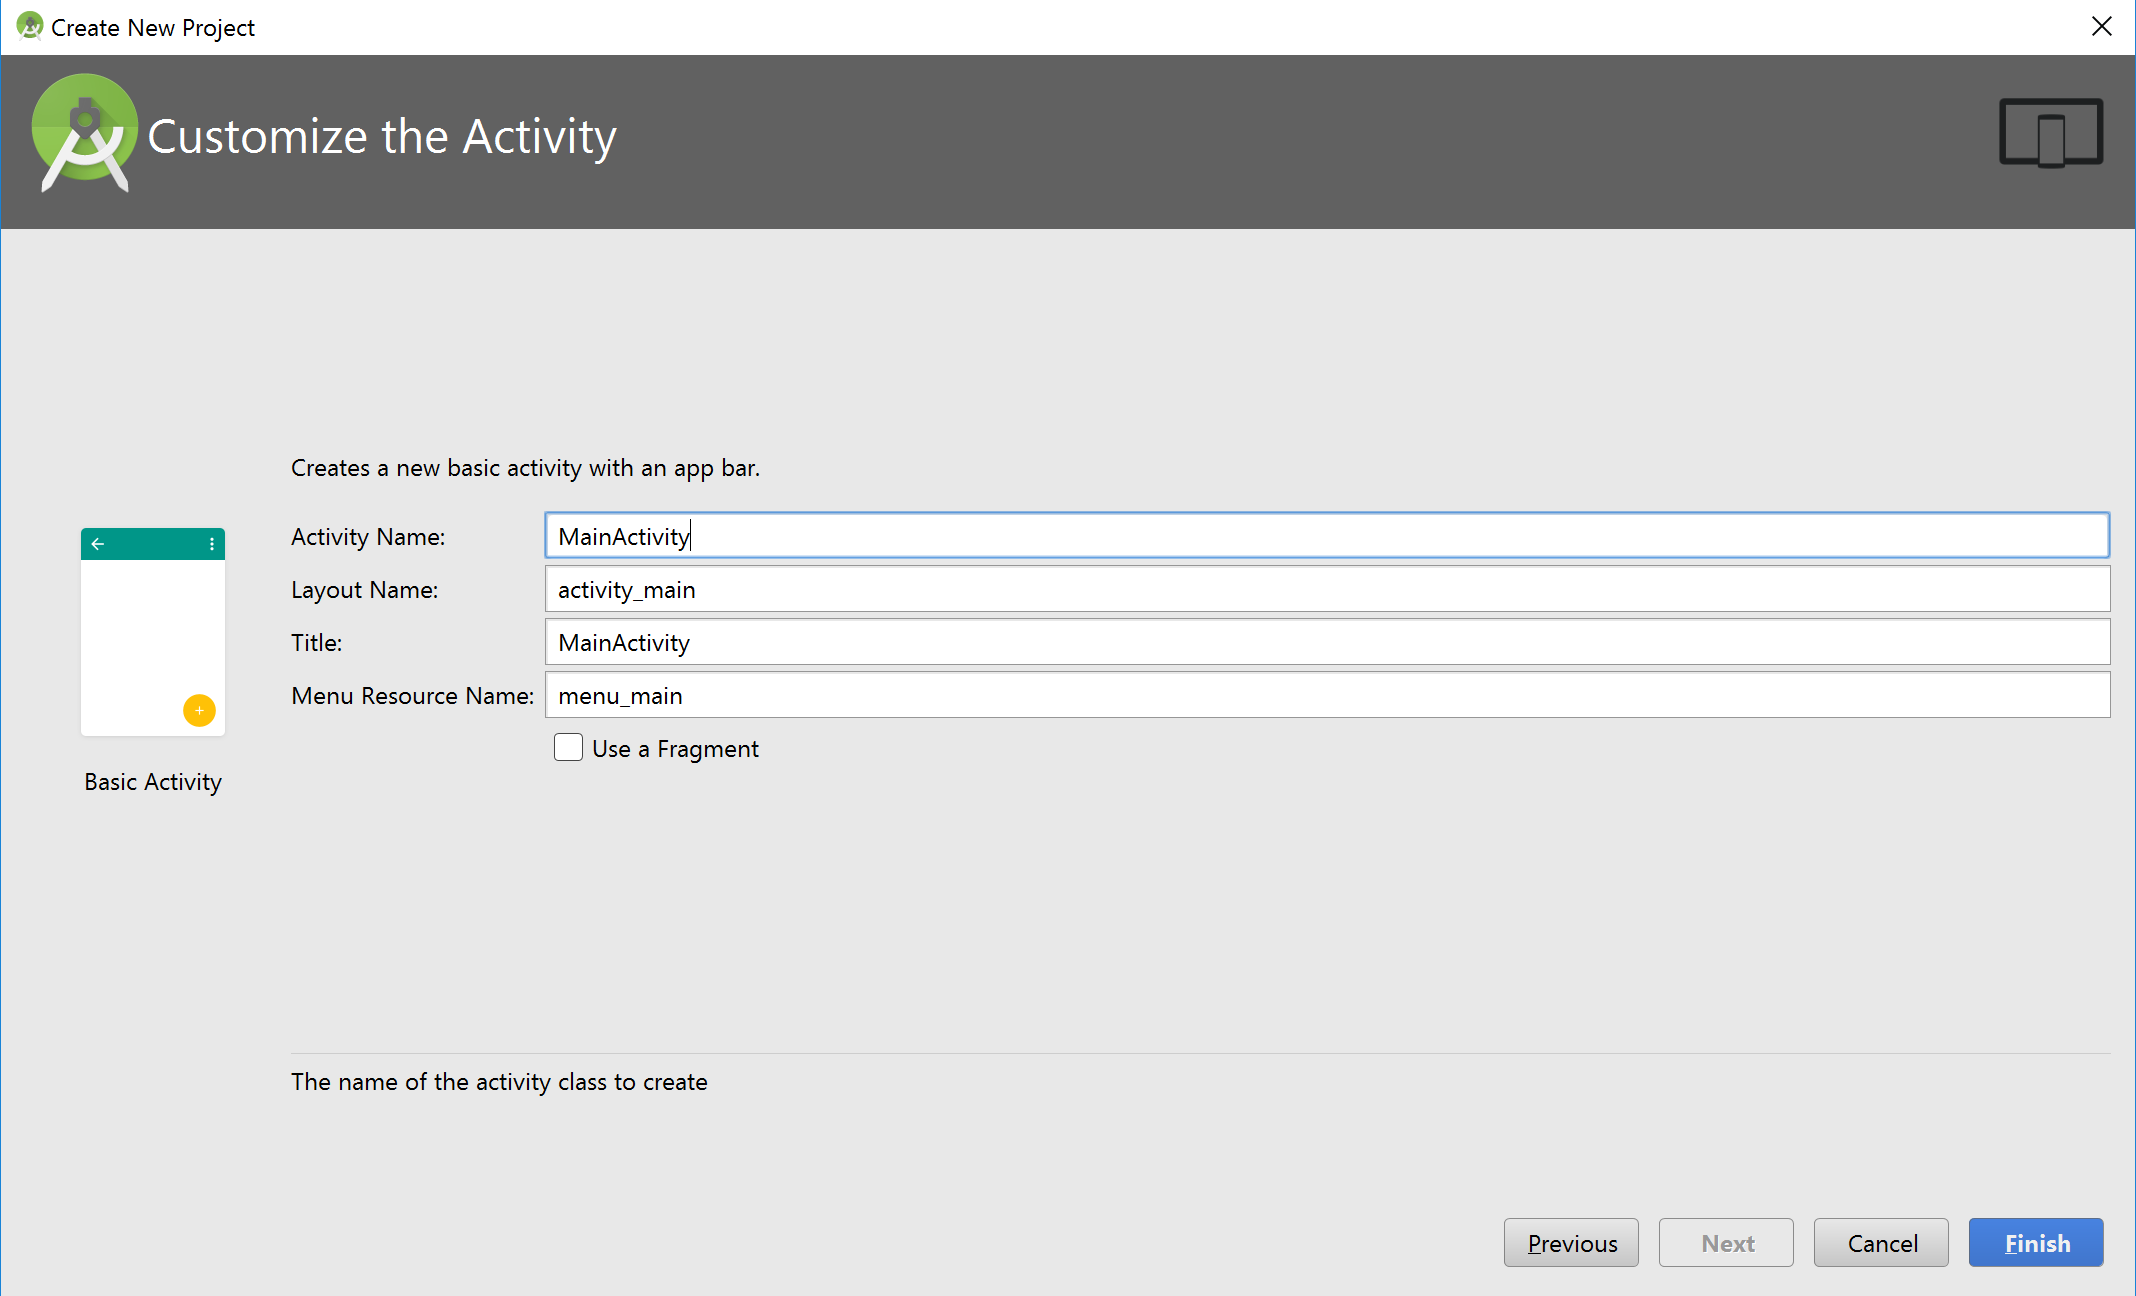
5.1. Create an Android project
-
Start a new Android project
-
Specify project details and click on Next
-
Application name: EventRegistration-Android
-
Company Domain:
ecse321.mcgill.ca -
Project location: create the project within the cloned git repository /home/student/git/HandsOnXX/EventRegistrationAndroid)
-
Package:
ca.mcgill.ecse321.eventregistration -
Click on Next
-
-
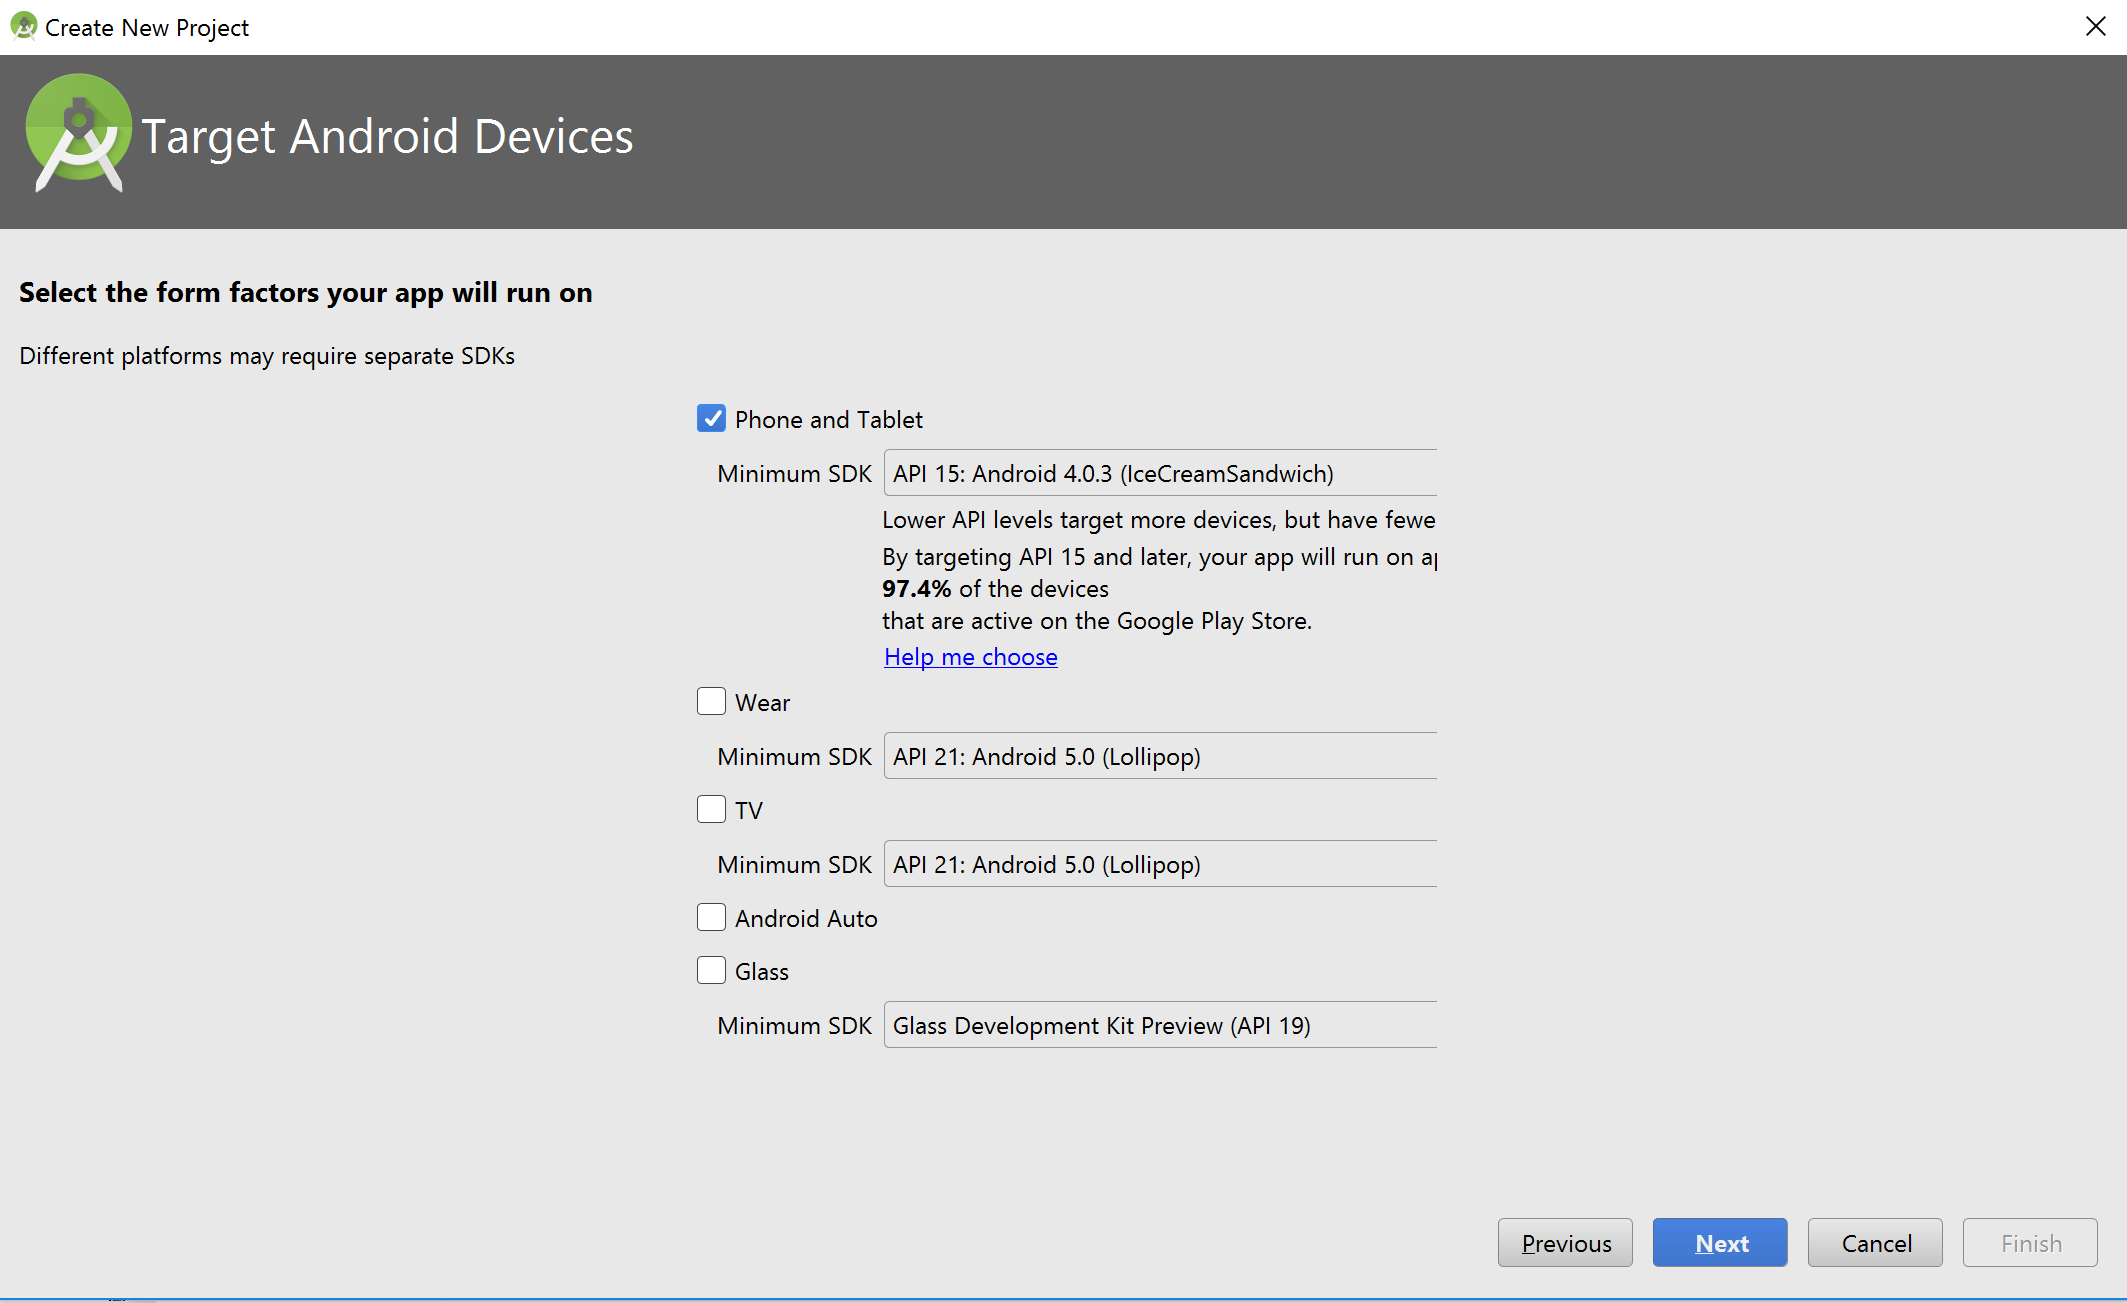
Leave the default settings for the target platform and click on Next
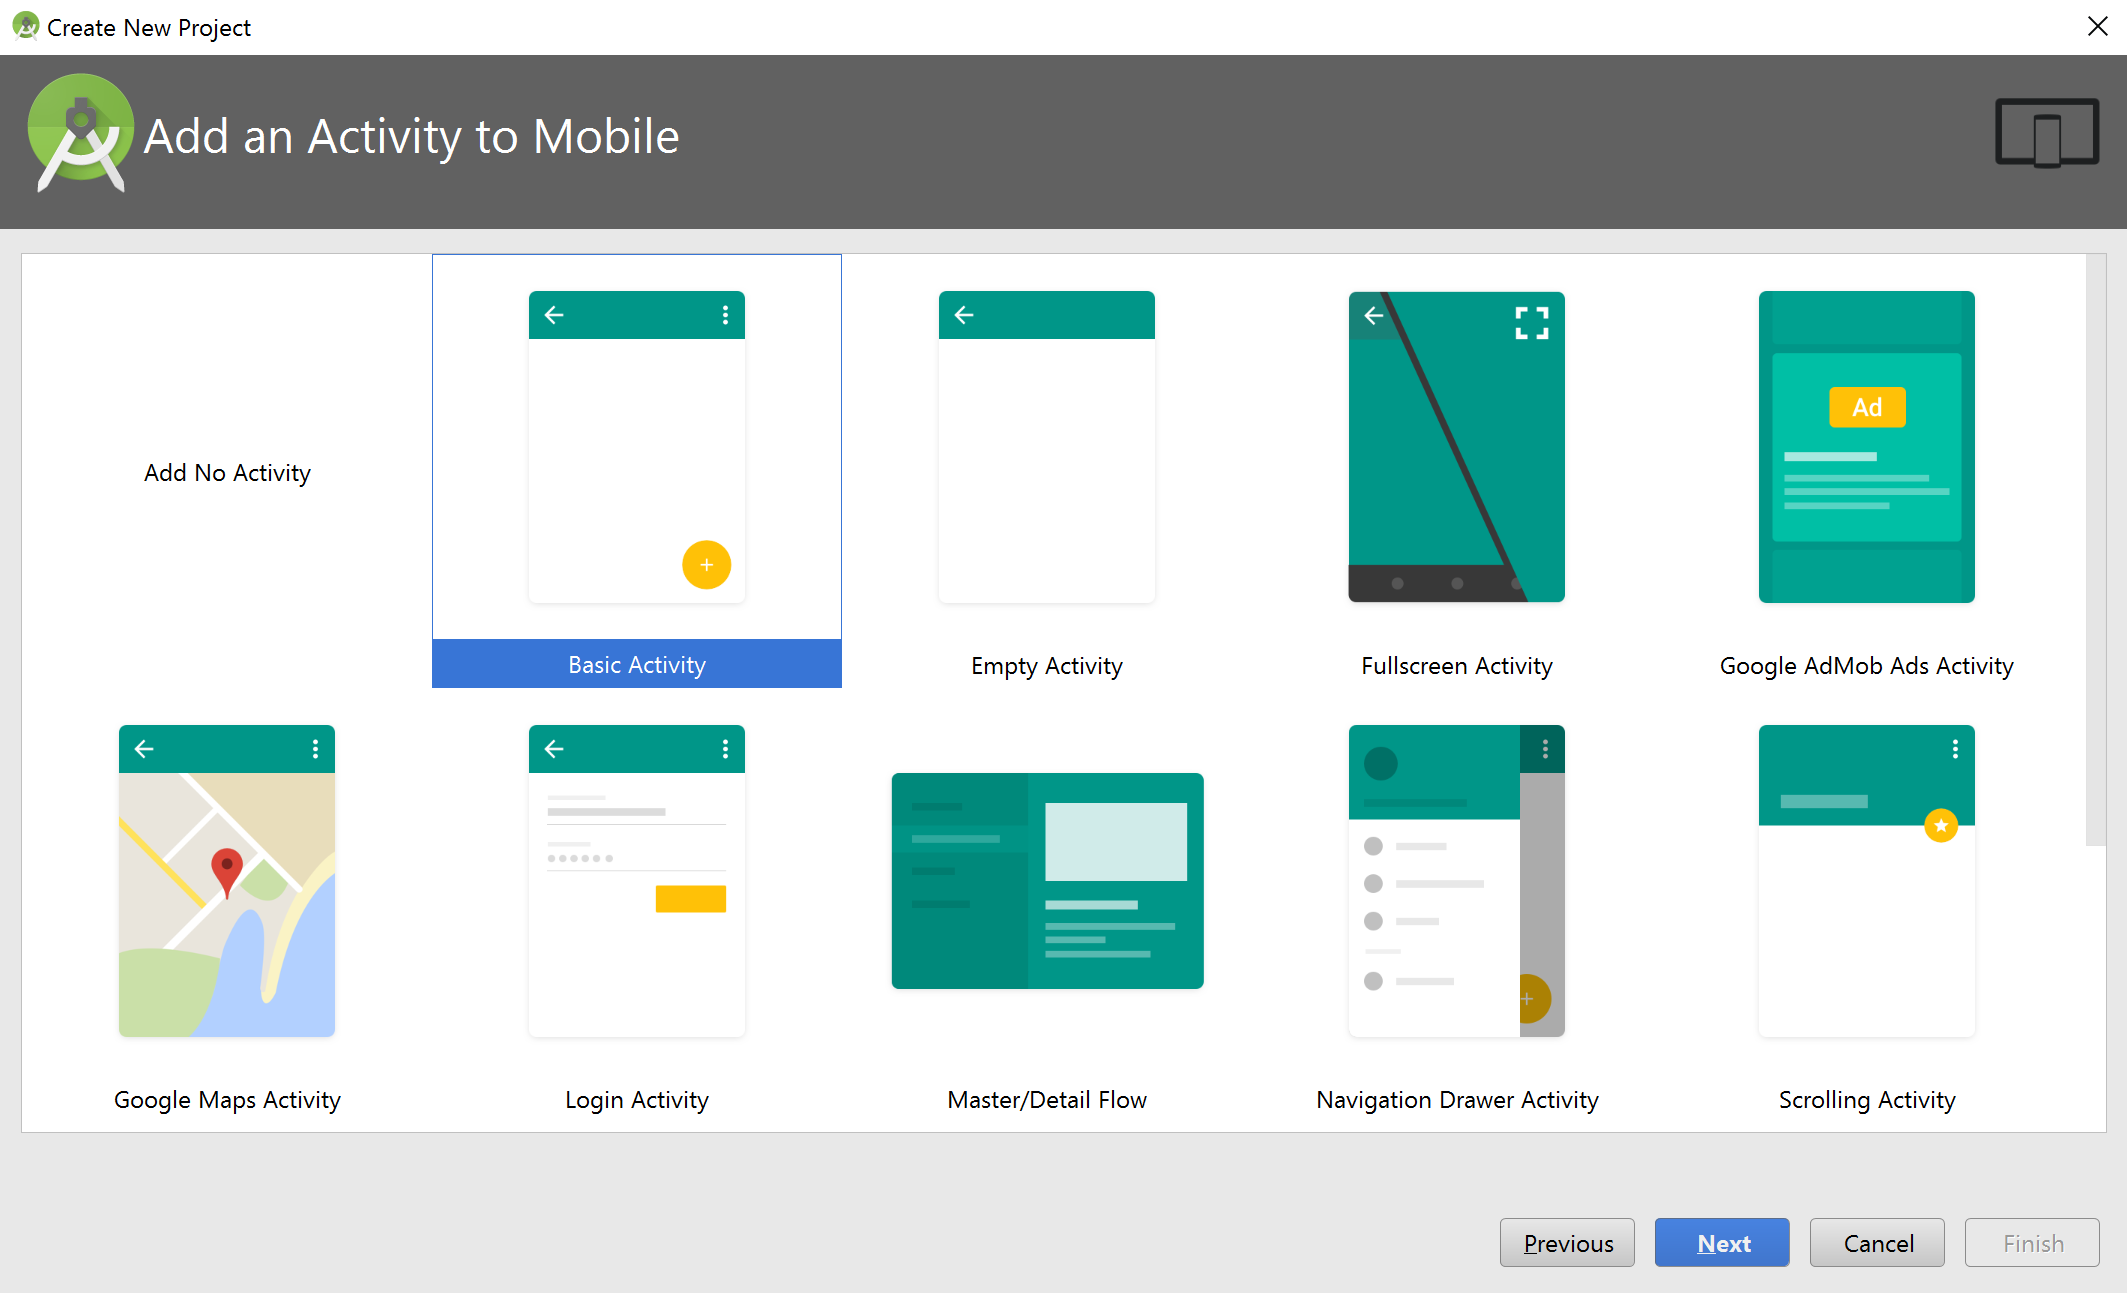
-
Select a Basic Activity and click Next
-
Leave activity defaults as they are (no further customization is needed) and click on Finish
-
Wait until the project is built by Gradle
-
Optional step.
TipOptionally, to setup version control integration, go to File/Settings…/Version Control and add the repository as Git root to the project settings
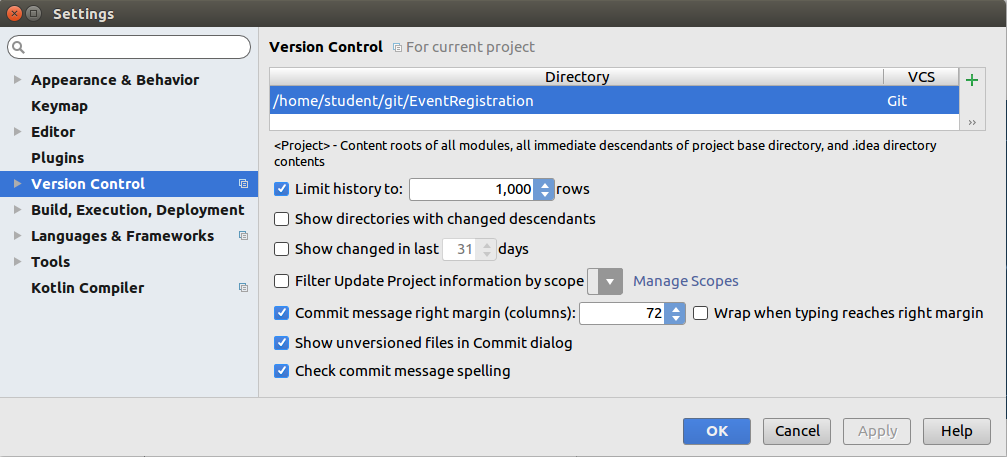
Then, you can issue Git commands from the VCS menu in Android Studio while developing the application. Regardless whether you complete this step or not, you can still use git from the command line, since the project is created in the working directory of your git repository. -
Select the Project view in the left pane (instead of the default Android view) and observe three files:
-
MainActivity.java: application code is written here (located in app/src/main/java)
-
content_main.xml: layout specifications of the UI are provided in XML (located in app/src/main/res/layout)
-
strings.xml: naming of resources (located in app/src/main/res/values)
-
-
Include a dependency for network communication by adding the following line to the
build.gradlefile located in the app/src folder to the end within thedependencies{}part (see figure, but the content is different).implementation 'com.loopj.android:android-async-http:1.4.9'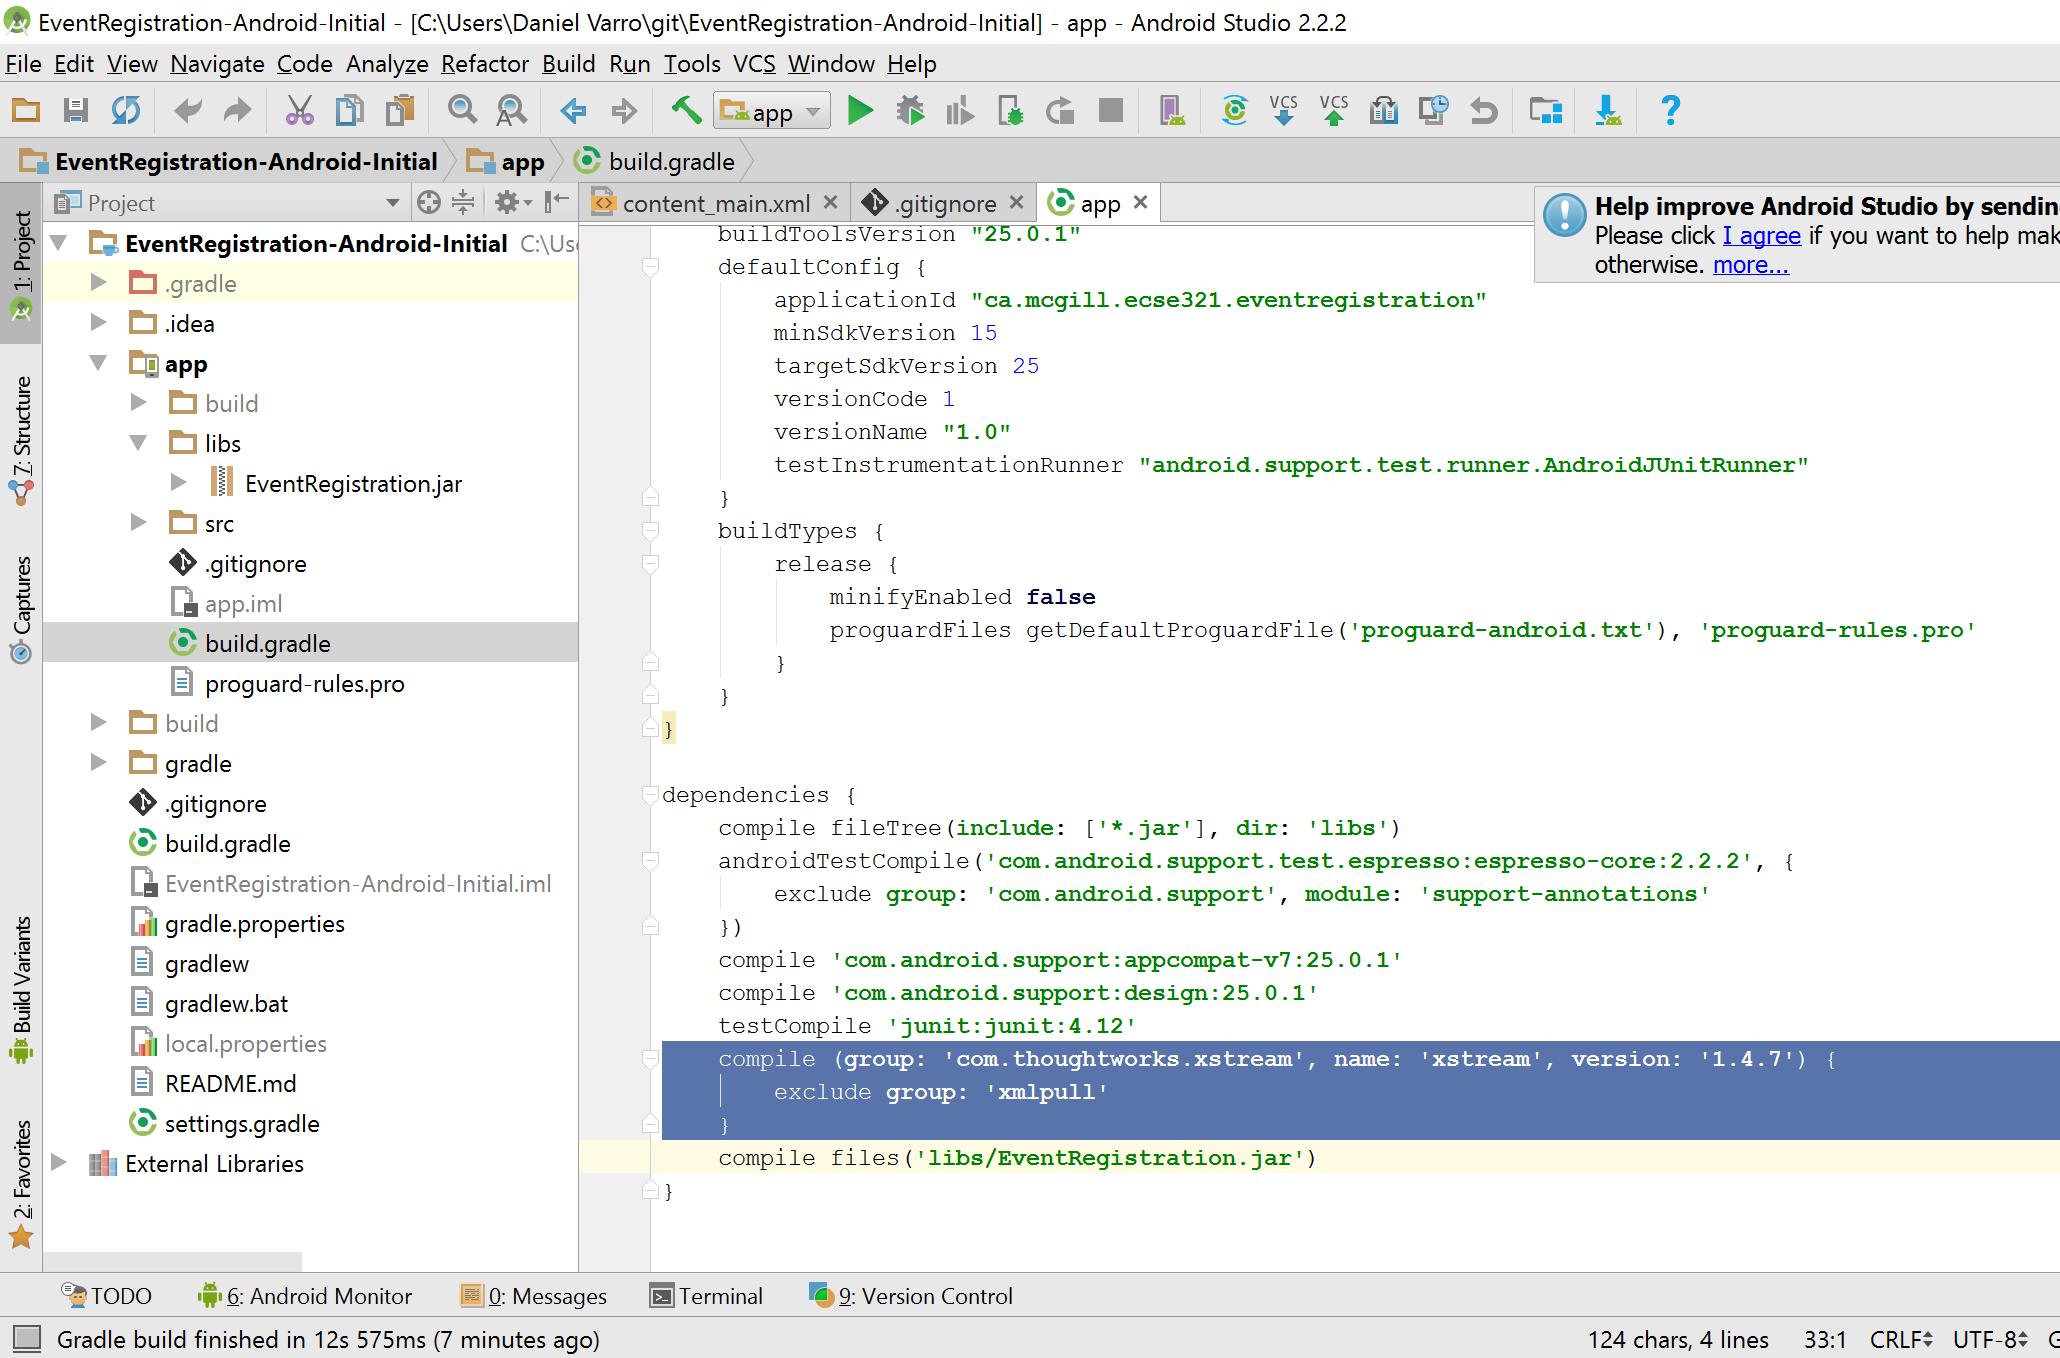
-
Open the AndroidManifest.xml file (located in
app/src/mainwithin the Android project), and add the following XML tag for setting permissions appropriately (before the existing<application>tag)<?xml version="1.0" encoding="utf-8"?> <manifest xmlns:android="http://schemas.android.com/apk/res/android" package="ca.mcgill.ecse321.eventregistration"> <uses-permission android:name="android.permission.INTERNET"/> <!-- Existing content with <application> tag --> </manifest> -
As the gradle build file has changed, click on the Sync link.
-
Re-build the project by Build | Make Project if still needed.
5.2. Developing for Android: Part 1
5.2.1. Developing the View Layout
In the next steps, we will develop a simple GUI as the view for the mobile EventRegistration app with (1) one text field for specifying the name of a person, and (2) one Add Person button
The GUI will look like as depicted below.
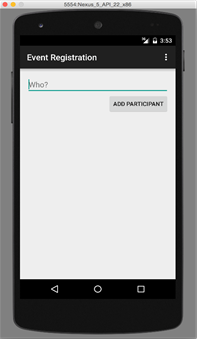
-
Open the content_main.xml file, which contains a default Hello World text.
-
Replace the highlighted default content with the following XML tags.
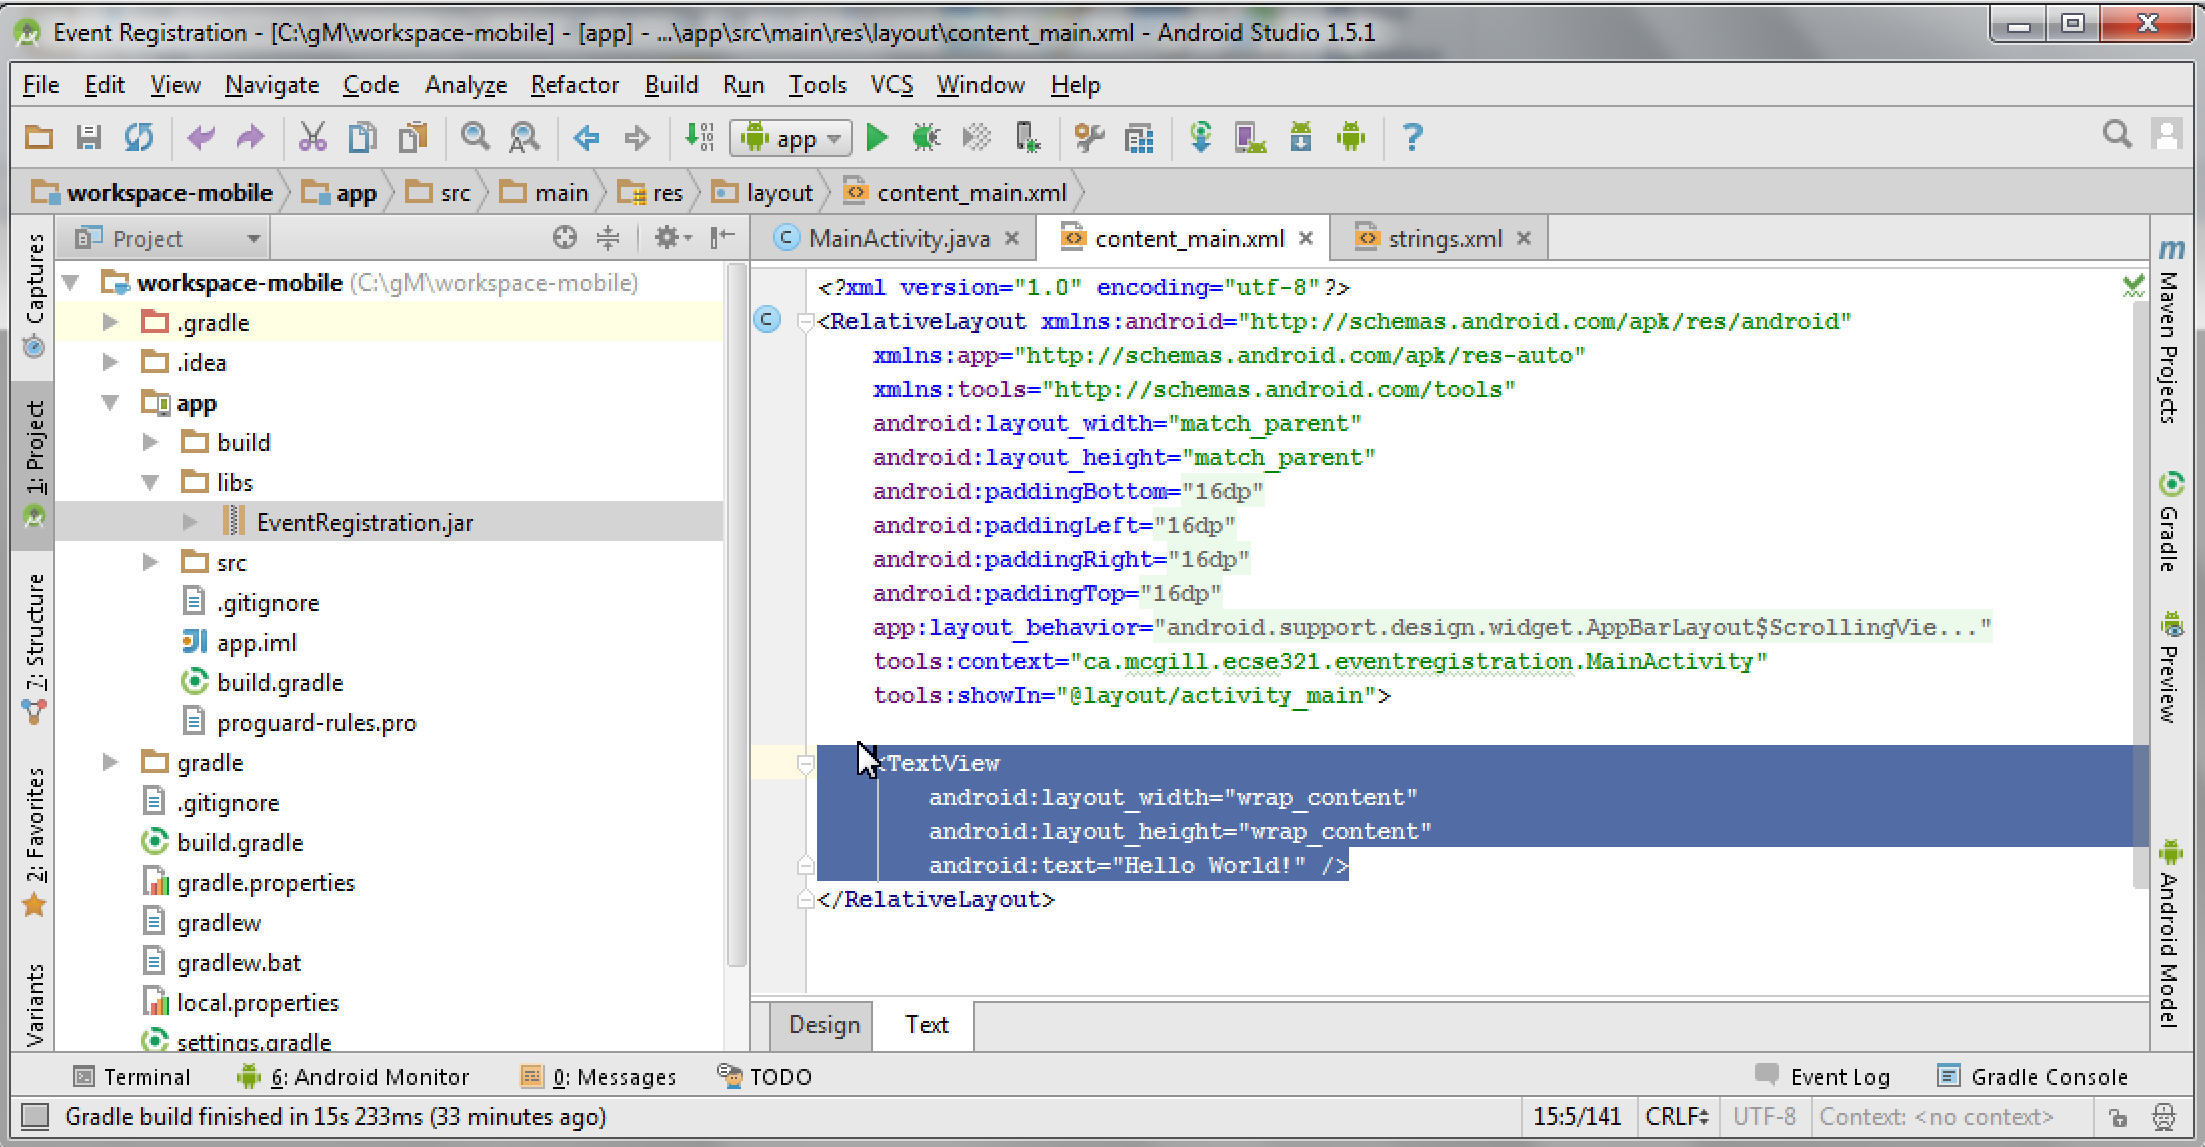
<LinearLayout
    android:layout_width="match_parent"
    android:layout_height="wrap_content"
    android:orientation="vertical"
    app:layout_constraintLeft_toLeftOf="parent"
    app:layout_constraintRight_toRightOf="parent"
    app:layout_constraintTop_toTopOf="parent">

    <TextView
            android:id="@+id/error"
            android:layout_height="wrap_content"
            android:layout_width="wrap_content"
            android:visibility="gone"
            android:text=""
            android:textColor="@color/colorAccent"/>

    <EditText
        android:layout_width="match_parent"
        android:layout_height="wrap_content"
        android:id="@+id/newperson_name"
        android:hint="@string/newperson_hint"/>

    <Button
        android:layout_width="wrap_content"
        android:layout_height="wrap_content"
        android:layout_gravity="end"
        android:text="@string/newperson_button"
        android:onClick="addPerson"/>
</LinearLayout>
-
LinearLayout declares a vertical layout to hold the GUI elements;
-
EditText adds a textfield to enter the name of the person;
-
Button provides a button to add a person.
Some erroneous tags are marked in red, which will be corrected in the following steps.
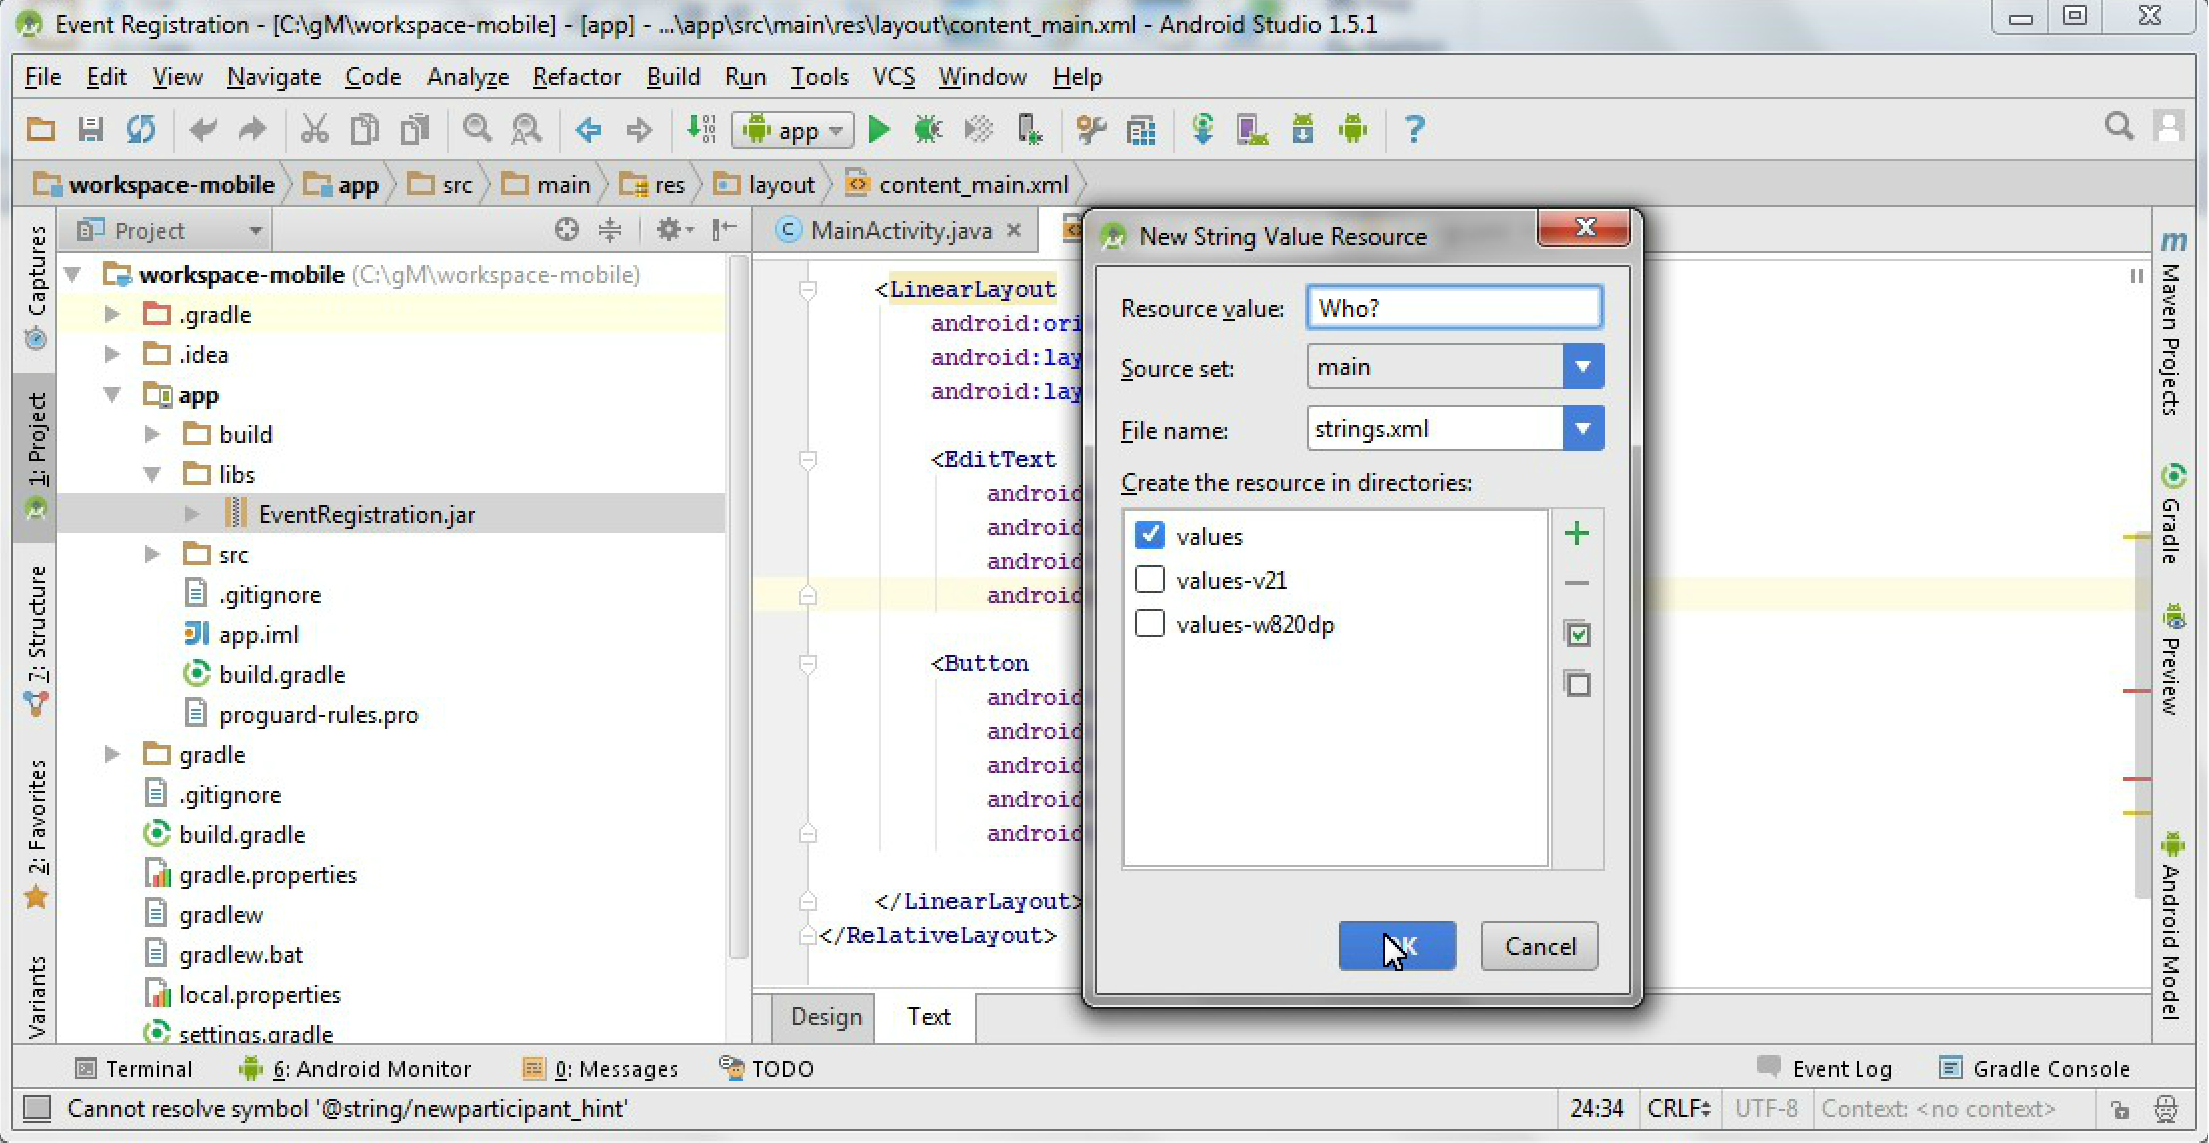
Specifying a text field
-
We change the user visible text as a string value resource by clicking on red quick fix marker.

-
Add the default hint text (e.g. "Who?") in the pop-up window and leave all other settings on default values. Click on OK once done.
Specifying a button
-
Click on the red quick fix marker of the button to correct field @string/newperson_button
-
Write Add Person as resource value in the pop-up window and click OK.
Observing the view
-
Save the file content_main.xml.
-
Click on the Design tab to check the graphical preview of the app.

-
Open strings.xml if you wish to observe where the newly specified values can be changed in the future.
5.2.2. Connecting to backend via RESTful service calls
As a next step, we define a view depicted below and add Java code to provide behavior for the view, e.g. what should happen when the different buttons are clicked. The key interactions of our application are the following:
-
What to do when the application is launched? (
onCreate()) -
What to do when a button is clicked? (
addPerson())
Create a utility class for communicating with HTTP messages
-
Make sure you have the
implementation 'com.loopj.android:android-async-http:1.4.9'dependency (among others) in thebuild.gradlefile for theappmodule (see the section on project setup for more details) -
Create the
HttpUtilsclass in theca.mcgill.ecse321.eventregistrationpackage and add missing imports as required with Alt+Enterpublic class HttpUtils { public static final String DEFAULT_BASE_URL = "http://my-eventregistration-backend-app.herokuapp.com/"; private static String baseUrl; private static AsyncHttpClient client = new AsyncHttpClient(); static { baseUrl = DEFAULT_BASE_URL; } public static String getBaseUrl() { return baseUrl; } public static void setBaseUrl(String baseUrl) { HttpUtils.baseUrl = baseUrl; } public static void get(String url, RequestParams params, AsyncHttpResponseHandler responseHandler) { client.get(getAbsoluteUrl(url), params, responseHandler); } public static void post(String url, RequestParams params, AsyncHttpResponseHandler responseHandler) { client.post(getAbsoluteUrl(url), params, responseHandler); } public static void getByUrl(String url, RequestParams params, AsyncHttpResponseHandler responseHandler) { client.get(url, params, responseHandler); } public static void postByUrl(String url, RequestParams params, AsyncHttpResponseHandler responseHandler) { client.post(url, params, responseHandler); } private static String getAbsoluteUrl(String relativeUrl) { return baseUrl + relativeUrl; } }
Further helper methods
-
Open the MainActivity.java file.
-
Add a new attribute to the beginning of the class for error handling.
// ... public class MainActivity extends AppCompatActivity { private String error = null; // ... } -
Implement the
refreshErrorMessage()method to display the error message on the screen, if there is any.NoteAgain, add imports with Alt+Enter (import is needed for TextView)private void refreshErrorMessage() { // set the error message TextView tvError = (TextView) findViewById(R.id.error); tvError.setText(error); if (error == null || error.length() == 0) { tvError.setVisibility(View.GONE); } else { tvError.setVisibility(View.VISIBLE); } } -
Add code to initialize the application in the
onCreate()method (after the auto-generated code).@Override protected void onCreate(Bundle savedInstanceState) { // ... // INSERT TO END OF THE METHOD AFTER AUTO-GENERATED CODE // initialize error message text view refreshErrorMessage(); }
Creating a handler for Add Person button
-
Implement the
addPerson()method as followspublic void addPerson(View v) { error = ""; final TextView tv = (TextView) findViewById(R.id.newperson_name); HttpUtils.post("persons/" + tv.getText().toString(), new RequestParams(), new JsonHttpResponseHandler() { @Override public void onSuccess(int statusCode, Header[] headers, JSONObject response) { refreshErrorMessage(); tv.setText(""); } @Override public void onFailure(int statusCode, Header[] headers, Throwable throwable, JSONObject errorResponse) { try { error += errorResponse.get("message").toString(); } catch (JSONException e) { error += e.getMessage(); } refreshErrorMessage(); } }); } -
Import the missing classes again with Alt+Enter. There are multiple
Headerclasses available, you need to import thecz.msebera.android.httpclient.Headerclass.
5.3. Running and Testing the Application on a Virtual Device
-
Start the Spring backend application on Heroku, while ensure that the
DEFAULT_BASE_URLinHttpUtilsis configured accordingly. -
Click on the AVD manager button in Android Studio near the top right corner of the window
-
Add a new device with default settings.
NoteYou might be asked to download emulator files. If this happens, click OK. -
Start/Debug the application using the buttons highlighted on the figure below
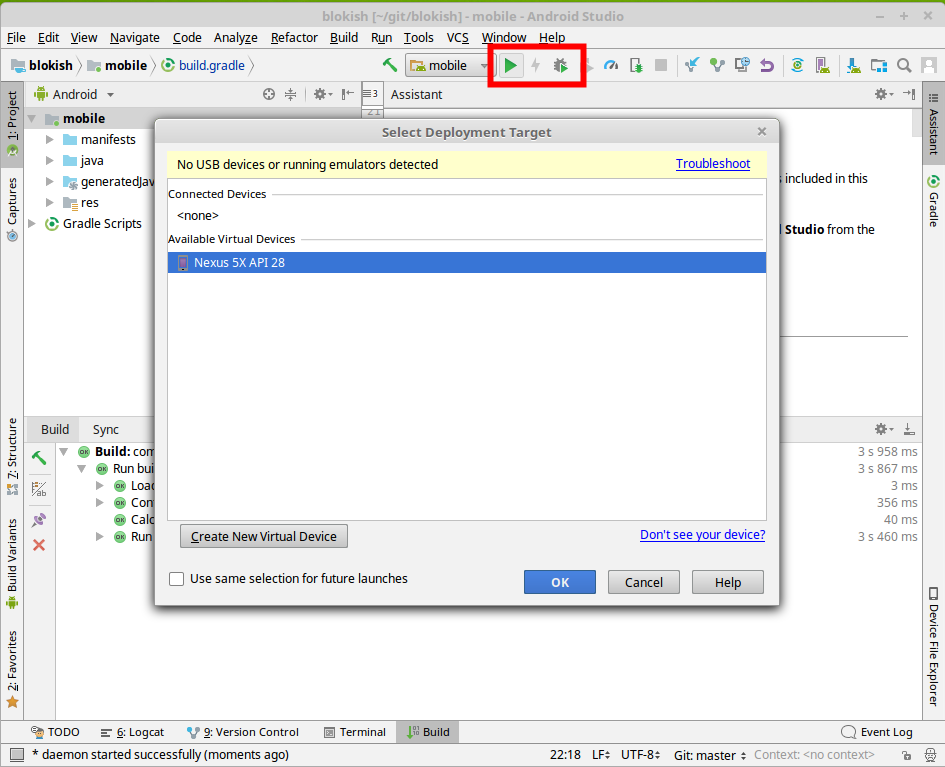
-
After you select the device (in this case Nexus 5X) as deployment target, the application will automatically be deployed and started within an Android VM, and it is ready to use. Be patient, deployment and startup may take a few seconds.
-
Leave the text field empty, then try adding a person. You should get an error message on screen saying a person cannot be added with no name.
-
Supply a name for a new person, then try adding it. Upon successful completion, the text field and the error message should clear.
5.4. Developing for Android (Part 2)
|
Note
|
You can use the https://eventregistration-backend-123.herokuapp.com backend URL for the event registration example in the HttpUtils class.
|
As a next step, we extend the view and its behavior. Key interactions of our application added in this phase are the following:
-
What to do when the application is launched? (
onCreate()) -
What to do when application data is updated? (
refreshLists()) -
What to do when a button is clicked? (
addEvent(), andregister())
The expected layout of the application:
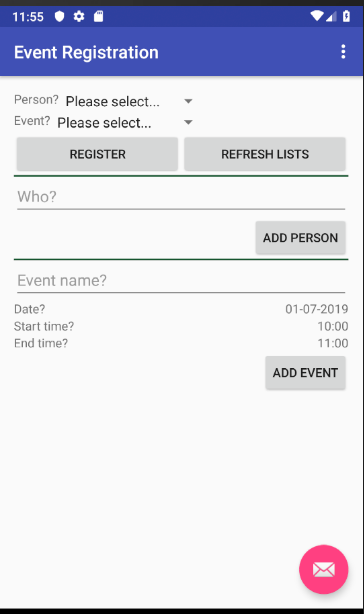
5.4.1. Create helper classes
-
Create the classes included in the next two steps within the
ca.mcgill.ecse321.eventregistrationpackage -
Create a new class called
DatePickerFragmentpublic class DatePickerFragment extends DialogFragment implements DatePickerDialog.OnDateSetListener { @Override public Dialog onCreateDialog(Bundle savedInstanceState) { // Use the current date as the default date in the picker final Calendar c = Calendar.getInstance(); int year = c.get(Calendar.YEAR); int month = c.get(Calendar.MONTH); int day = c.get(Calendar.DAY_OF_MONTH); // Parse the existing time from the arguments Bundle args = getArguments(); if (args != null) { year = args.getInt("year"); month = args.getInt("month"); day = args.getInt("day"); } // Create a new instance of DatePickerDialog and return it return new DatePickerDialog(getActivity(), this, year, month, day); } public void onDateSet(DatePicker view, int year, int month, int day) { MainActivity myActivity = (MainActivity)getActivity(); myActivity.setDate(getArguments().getInt("id"), day, month, year); } } -
Create a new class called
TimePickerFragmentpublic class TimePickerFragment extends DialogFragment implements TimePickerDialog.OnTimeSetListener { String label; @Override public Dialog onCreateDialog(Bundle savedInstanceState) { int hour = 0; int minute = 0; // Parse the existing time from the arguments Bundle args = getArguments(); if (args != null) { hour = args.getInt("hour"); minute = args.getInt("minute"); } // Create a new instance of TimePickerDialog and return it return new TimePickerDialog(getActivity(), this, hour, minute, DateFormat.is24HourFormat(getActivity())); } public void onTimeSet(TimePicker view, int hourOfDay, int minute) { MainActivity myActivity = (MainActivity)getActivity(); myActivity.setTime(getArguments().getInt("id"), hourOfDay, minute); } } -
Add the following helper methods within the
MainActivityclass to support date and time pickersprivate Bundle getTimeFromLabel(String text) { Bundle rtn = new Bundle(); String comps[] = text.toString().split(":"); int hour = 12; int minute = 0; if (comps.length == 2) { hour = Integer.parseInt(comps[0]); minute = Integer.parseInt(comps[1]); } rtn.putInt("hour", hour); rtn.putInt("minute", minute); return rtn; } private Bundle getDateFromLabel(String text) { Bundle rtn = new Bundle(); String comps[] = text.toString().split("-"); int day = 1; int month = 1; int year = 1; if (comps.length == 3) { day = Integer.parseInt(comps[0]); month = Integer.parseInt(comps[1]); year = Integer.parseInt(comps[2]); } rtn.putInt("day", day); rtn.putInt("month", month-1); rtn.putInt("year", year); return rtn; } public void showTimePickerDialog(View v) { TextView tf = (TextView) v; Bundle args = getTimeFromLabel(tf.getText().toString()); args.putInt("id", v.getId()); TimePickerFragment newFragment = new TimePickerFragment(); newFragment.setArguments(args); newFragment.show(getSupportFragmentManager(), "timePicker"); } public void showDatePickerDialog(View v) { TextView tf = (TextView) v; Bundle args = getDateFromLabel(tf.getText().toString()); args.putInt("id", v.getId()); DatePickerFragment newFragment = new DatePickerFragment(); newFragment.setArguments(args); newFragment.show(getSupportFragmentManager(), "datePicker"); } public void setTime(int id, int h, int m) { TextView tv = (TextView) findViewById(id); tv.setText(String.format("%02d:%02d", h, m)); } public void setDate(int id, int d, int m, int y) { TextView tv = (TextView) findViewById(id); tv.setText(String.format("%02d-%02d-%04d", d, m + 1, y)); }
5.4.2. Update view definition
-
The corresponding (but partly incomplete) view definition in the
content_main.xmlfile is the following:<?xml version="1.0" encoding="utf-8"?> <RelativeLayout xmlns:android="http://schemas.android.com/apk/res/android" xmlns:app="http://schemas.android.com/apk/res-auto" xmlns:tools="http://schemas.android.com/tools" android:id="@+id/content_main" android:layout_width="match_parent" android:layout_height="match_parent" android:paddingBottom="16dp" android:paddingLeft="16dp" android:paddingRight="16dp" android:paddingTop="16dp" app:layout_behavior="@string/appbar_scrolling_view_behavior" tools:context="ca.mcgill.ecse321.eventregistration.MainActivity" tools:showIn="@layout/activity_main"> <LinearLayout android:layout_height="wrap_content" android:layout_width="match_parent" android:orientation="vertical"> <TextView android:id="@+id/error" android:layout_height="wrap_content" android:layout_width="wrap_content" android:visibility="gone" android:text="" android:textColor="@color/colorAccent"/> <LinearLayout android:layout_height="wrap_content" android:layout_width="match_parent" android:orientation="vertical"> <LinearLayout android:layout_width="wrap_content" android:layout_height="match_parent" android:orientation="vertical"> <LinearLayout android:orientation="horizontal" android:layout_height="wrap_content" android:layout_width="match_parent"> <TextView android:layout_height="wrap_content" android:layout_width="wrap_content" android:text="@string/personspinner_label"/> <Spinner android:layout_height="wrap_content" android:layout_width="wrap_content" android:layout_gravity="end" android:id="@+id/personspinner"/> </LinearLayout> <LinearLayout android:orientation="horizontal" android:layout_height="wrap_content" android:layout_width="match_parent"> <TextView android:layout_height="wrap_content" android:layout_width="wrap_content" android:text="@string/eventspinner_label"/> <Spinner android:id="@+id/eventspinner" android:layout_width="match_parent" android:layout_height="wrap_content" android:layout_gravity="end" android:layout_margin="0dp"/> </LinearLayout> </LinearLayout> <!-- TODO add a Register and Refresh Lists buttons here --> </LinearLayout> <View android:layout_height="2dp" android:layout_width="fill_parent" android:background="#16552e"/> <LinearLayout android:orientation="vertical" android:layout_height="wrap_content" android:layout_width="match_parent"> <EditText android:layout_width="match_parent" android:layout_height="wrap_content" android:id="@+id/newperson_name" android:hint="@string/newperson_hint"/> <Button android:layout_width="wrap_content" android:layout_height="wrap_content" android:layout_gravity="end" android:text="@string/newperson_button" android:onClick="addPerson"/> </LinearLayout> <View android:layout_height="2dp" android:layout_width="fill_parent" android:background="#16552e"/> <LinearLayout android:layout_width="match_parent" android:layout_height="wrap_content" android:orientation="vertical"> <EditText android:id="@+id/newevent_name" android:layout_height="wrap_content" android:layout_width="fill_parent" android:hint="@string/newevent_hint"/> <LinearLayout android:orientation="horizontal" android:layout_height="wrap_content" android:layout_width="match_parent"> <TextView android:layout_height="wrap_content" android:layout_width="0dp" android:layout_weight="1" android:text="@string/newevent_date_label"/> <TextView android:layout_height="wrap_content" android:layout_width="wrap_content" android:text="@string/newevent_date_first" android:layout_gravity="end" android:id="@+id/newevent_date" android:onClick="showDatePickerDialog"/> </LinearLayout> <LinearLayout android:orientation="horizontal" android:layout_height="wrap_content" android:layout_width="match_parent"> <TextView android:layout_height="wrap_content" android:layout_width="0dp" android:layout_weight="1" android:text="@string/starttime_label"/> <TextView android:layout_height="wrap_content" android:layout_width="wrap_content" android:text="@string/starttime_first" android:layout_gravity="end" android:id="@+id/starttime" android:onClick="showTimePickerDialog"/> </LinearLayout> <!-- TODO add a label and a time picker for event end time --> <!-- TODO add Add Event button here --> </LinearLayout> </LinearLayout> </RelativeLayout> -
The missing string definitions go in the
res/values/strings.xmlresource<resources> <string name="app_name">Event Registration</string> <string name="action_settings">Settings</string> <string name="newperson_hint">Who?</string> <string name="newperson_button">Add Person</string> <string name="newevent_date_label">Date?</string> <string name="personspinner_label">Person?</string> <string name="eventspinner_label">Event?</string> <string name="starttime_label">Start time?</string> <string name="newevent_date_first">01-07-2019</string> <string name="starttime_first">10:00</string> </resources>-
TODO: add a Register button to allow registering a selected person to a selected event (call the
register()method when clicked - this is to be implemented in the upcoming steps) -
TODO: add a Refresh Lists button that refreshes the contents of the event and person spinners (call the
refreshLists()method when clicked) -
TODO: add a label with text End? below the Start? label
-
TODO: add a time picker to select the end time of a new event
-
TODO: add an Add Event button to allow creating new events from the user interface (call the
addEvent()method when clicked - this is to be implemented in the upcoming steps)
-
5.4.3. Initialization on application launch
-
Open the MainActivity.java file.
-
Add a few new attributes to the beginning of the class as helpers for persistence and error handling.
public class MainActivity extends AppCompatActivity { private String error = null; // APPEND NEW CONTENT STARTING FROM HERE private List<String> personNames = new ArrayList<>(); private ArrayAdapter<String> personAdapter; private List<String> eventNames = new ArrayList<>(); private ArrayAdapter<String> eventAdapter; //... }-
Import missing classes (e.g. use Alt+Enter)
-
-
Add code to initialize the application with data from the server in the
onCreate()method (after the auto-generated code).@Override protected void onCreate(Bundle savedInstanceState) { // ... // INSERT TO END OF THE METHOD // Add adapters to spinner lists and refresh spinner content Spinner personSpinner = (Spinner) findViewById(R.id.personspinner); Spinner eventSpinner = (Spinner) findViewById(R.id.eventspinner); personAdapter = new ArrayAdapter<String>(this, android.R.layout.simple_spinner_item, personNames); personAdapter.setDropDownViewResource(android.R.layout.simple_spinner_dropdown_item); personSpinner.setAdapter(personAdapter); eventAdapter = new ArrayAdapter<String>(this, android.R.layout.simple_spinner_item, eventNames); eventAdapter.setDropDownViewResource(android.R.layout.simple_spinner_dropdown_item); eventSpinner.setAdapter(eventAdapter); // Get initial content for spinners refreshLists(this.getCurrentFocus()); }
At this point the refreshLists() method is missing, this is to be implemented in the upcoming steps.
5.4.4. Reactions to updated data
-
Create the missing new method
refreshLists()which seeks for the event and person spinners and sets their content according to the data retrieved from the serverpublic void refreshLists(View view) { refreshList(personAdapter ,personNames, "people"); refreshList(eventAdapter, eventNames, "events"); } private void refreshList(ArrayAdapter<String> adapter, List<String> names, String restFunctionName) { HttpUtils.get(restFunctionName, new RequestParams(), new JsonHttpResponseHandler() { @Override public void onSuccess(int statusCode, Header[] headers, JSONArray response) { names.clear(); names.add("Please select..."); for( int i = 0; i < response.length(); i++){ try { names.add(response.getJSONObject(i).getString("name")); } catch (Exception e) { error += e.getMessage(); } refreshErrorMessage(); } adapter.notifyDataSetChanged(); } @Override public void onFailure(int statusCode, Header[] headers, Throwable throwable, JSONObject errorResponse) { try { error += errorResponse.get("message").toString(); } catch (JSONException e) { error += e.getMessage(); } refreshErrorMessage(); } }); }You may have error messages on names and adapter. This may indicate that you are using an old version of the Java compiler for the project. You either change it to a more recent version, or you add the
finalkeyword before the two variables in the list of parameters. -
Implement the
addEvent()methodpublic void addEvent(View v) { // start time TextView tv = (TextView) findViewById(R.id.starttime); String text = tv.getText().toString(); String comps[] = text.split(":"); int startHours = Integer.parseInt(comps[0]); int startMinutes = Integer.parseInt(comps[1]); // TODO get end time // date tv = (TextView) findViewById(R.id.newevent_date); text = tv.getText().toString(); comps = text.split("-"); int year = Integer.parseInt(comps[2]); int month = Integer.parseInt(comps[1]); int day = Integer.parseInt(comps[0]); // name tv = (TextView) findViewById(R.id.newevent_name); String name = tv.getText().toString(); // Reminder: calling the service looks like this: // http://192.168.56.50:8088/createEvent?eventName=tst&date=2013-10-23&startTime=00:00&endTime=23:59 RequestParams rp = new RequestParams(); NumberFormat formatter = new DecimalFormat("00"); rp.add("date", year + "-" + formatter.format(month) + "-" + formatter.format(day)); rp.add("startTime", formatter.format(startHours) + ":" + formatter.format(startMinutes)); // TODO add end time as parameter HttpUtils.post("events/" + name, rp, new JsonHttpResponseHandler() { @Override public void onSuccess(int statusCode, Header[] headers, JSONObject response) { refreshErrorMessage(); ((TextView) findViewById(R.id.newevent_name)).setText(""); } @Override public void onFailure(int statusCode, Header[] headers, Throwable throwable, JSONObject errorResponse) { try { error += errorResponse.get("message").toString(); } catch (JSONException e) { error += e.getMessage(); } refreshErrorMessage(); } }); }-
TODO: get the end time of the new event
-
TODO: supply the end time to the REST request as an additional parameter
-
-
Implement the
register()methodpublic void register(View v) { Spinner partSpinner = (Spinner) findViewById(R.id.personspinner); Spinner eventSpinner = (Spinner) findViewById(R.id.eventspinner); error = ""; // TODO issue an HTTP POST here // Set back the spinners to the initial state after posting the request partSpinner.setSelection(0); eventSpinner.setSelection(0); refreshErrorMessage(); }-
TODO: implement the HTTP POST part of the
register()method on your own
-